In this course, you will be required to publish your assignments on the World Wide Web. In order to do so, you will need to upload (copy/transfer) the files you create from your machine to the York Web Server to make them accessible for Web browsing. As a participant in this course, there are reserved spaces in the York Web server where your files may be stored for this purpose. This document describes how to prepare your web space for uploading future assignment documents by creating directories/folders in the remote server.
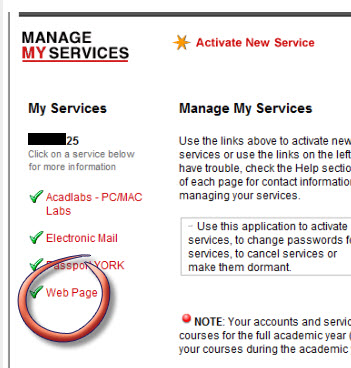
Ensure that your Student Web Page Account is activated via Manage My Services (This may take up to 24 hours).
You may already have this feature activated from previous courses but everyone must ensure that there is a green check mark on the Web page account icon in the list of your subscribed services in Manage My Services. When activated, you will see a green check-mark beside the service name, "Web Page", as with all your other active accounts services as shown in the example below.
If you do not have an FTP (File Transfer Protocol) client software already installed in your machine, download one of many free FTP programs from a reliable source.
Without any particular bias, I will use Core FTP LE for illustration. - Here is a link to a free download of Core FTP LE from the publisher.
Apple Mac users may download free Fetch from York′s Computing site.
Once you have saved the installation file in your system, execute (2x click) the saved program for an automatic installation.
Although there are many flavours of FTP software, the basic logic of the process is simple so if you understand the basics of using one FTP program, learning to use something else will be quite easy.
Even so, if you are a novice, it is vitally important that you read, attend to, and follow the instructions below precisely without skipping any parts.
Failing to exercise requisite care and attentiveness will cost you unnecessary frustration and time-wasting troubleshooting efforts.
Step #1 - The Core FTP LE Site Manager
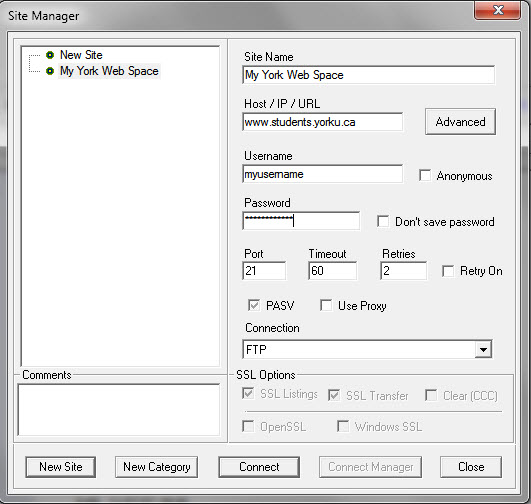
Launch Core FTP LE program; the Site Manager interface (Fig. 1) will appear.
Create a New Site connection profile using the following settings to open a FTP connection:
|
Site Name: |
Choose an appropriate name, e.g., My_York_Web_Space |
|
Host / IP: |
www.students.yorku.ca |
|
Username: |
Your Student Web Account username |
|
Password: |
Your Student Web Account password. |
|
Port: |
21 |
|
Connection: |
FTP; Leave default values in all other fields. |
Fig. 1 Site Manager - Connection Profile
|
|
Once you have specified (and checked the accuracy of ) the profile details, select Connect.
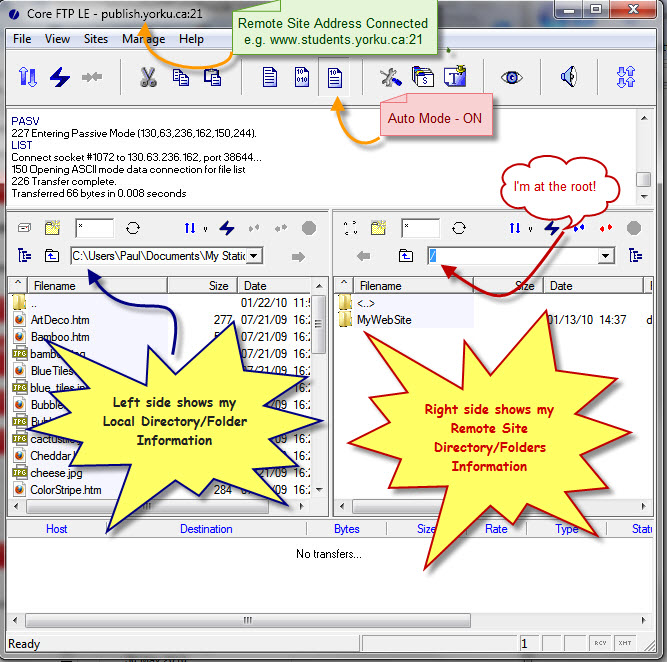
If correct entries have been made, a new connection interface similar to the example below (Fig. 2) will appear.
Step #2 - The Connection Interface
At first sight, the FTP connection interface may seem complicated and intimidating, but upon further inspection, you should find that it is essentially simpe and logical in its layout.
Inspect the interface elements and do mouse-over the various buttons available in the button bar below the menu before proceeding.
The dual (two) site directory display (each side similar in function as the typical file manager interface): (a) the left side represents your system, the local source site; (b) the right side represents the remote or the target site.
Many other useful information is displayed here. - For example, in Fig. 2, the "/" shows that I am connected to the "root" level (the upper-most level of the volume structure) of the remote site's directory tree.
Students will see different paths that look something like this: /home/perweb/14/yourusername/ - which, by the way, also tells you that you are connected to the root of your allocated remote site volume.
The Fig. 2 example shows that my remote site's root contains a folder called "MyWebSite" which I created some time in the past.
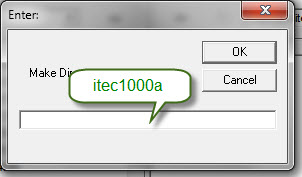
A student in this class must first create a folder called "itec1000a" in their root directory; then inside that directory, three more subdirectories named, a1, a2 and images. The information that follows will help you complete this task.
|
|
Step #3 - Setting Local System File Paths
Note: This is not critical until you actually do the assignment and create the files to upload but it is useful to plan to mirror the folder structure in both systems for convenience.
Ensure that you are in the correct local directory by navigating to where the files you want to upload/publish are located.
If required, use the Up Directory button to move up a level in the directory tree, or 2x-click on folder icons to move down deeper.
|
|
This icon may also be used to move up a level in the directory tree. Note that there is also a similar icon in the Local side but without the angle brackets. The two consecutive dots, .., are commonly used to represent the notion of "up directory" in network related contexts. |
Step #4 - Making New Directories/Folders
Now we are ready to make new directories or folders (the two terms are interchangeable). There are several easy ways to make new directories/folders wherever they are desired (both local and remote) to organize your files sensibly. Below are two examples.
Option #1.
Fig. 3 - Local and Remote Site Button Arrays
Fig. 4 - Name A New Folder Dialog Box
|
|
Option #2.
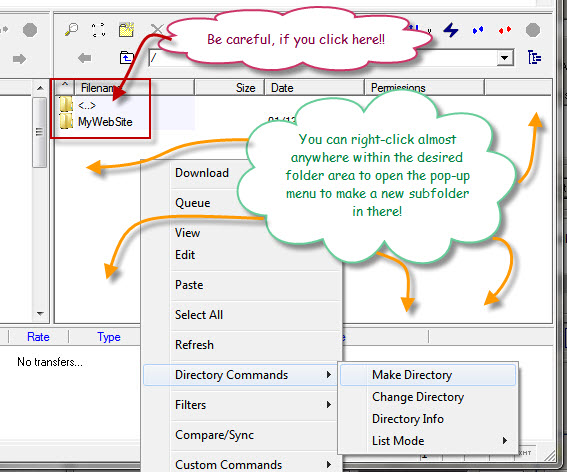
Another way to create a new directory/folder is by right-clicking inside the desired target directory (the one in which you want to create a new subdirectory/subfolder) to open a pop-up menu.
Fig. 5. shows the root directory of the remote site as the target directory within which a sub-folder will be created.
Fig. 5 - Make A Directory/Folder By Right-Clicking
|
|
Your remote site preparation is complete when, for example, the remote site - /home/perweb/14/yourusername/itec1000a/ - contains the subfolders as displayed in Fig. 6.
Fig 6. - Subfolders created inside the ../itec1000a/ directory

Congratulations! - Your Web space is now organized and ready for your assignment files.
A brief caveat note: although I have given the impression that a FTP client, such as Core FTP and Fetch, is required to perform the tasks described above, it is not exactly the whole story. There is also a simple way to achieve similar results using your Windows Explorer file manager interface (as some of you may already know) which will be discussed later in a different context. That being said, we should note, however, that it too relies on FTP as a part of the fundamental Internet service infrastructure.
Once you construct a web page file and upload it to, e.g., the a1 folder, that web page is published in the World Wide Web (WWW) which means that anyone may browse it using its Uniform Resource Locator (URL) address that looks something like this:
http://www.students.yorku.ca/~yourusername/itec1000a/a1/somefilename.html (More on URL specifications later.)
...But, at this point, since there is nothing in your folders to browse, obviously there is no point in trying to 'test-view' your site with a browser.
Speaking of browsers, there are occasions when different flavours of browsers render the same file differently. In many instances, the differences are minor but in other
instances, compatibility is a serious problem. I have found that the Moodle system is highly compatible with Mozilla based browsers such as Firefox (3.x or later) or Google Chrome
or Apple Safari. All online documents provided in this course are tested for compatibility with these browsers. Unfortunately, Microsoft's IE has been reported to be troublesome at
times although much less so since the release of version 8. If you must use IE as your browser, please ensure that you have the latest release version.