[draft / in progress]
A number of students in EECS 1021 have encountered a few problems when trying to get a simple JavaFX program working in IntelliJ. The problem appears to happen mostly on the Windows 10 machines, but does also happen on macOS.
Background
The setup: IntelliJ IDEA 2020 Community Edition, AdoptOpen JDK 14 and JavaFX 11.0.2. Students were instructed to follow this tutorial page at JetBrains. I created two walk-through videos: one for Windows and one for macOS that they could also follow.
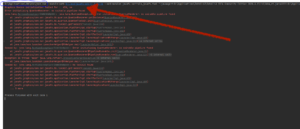
The problem: while everyone seems to be able to get the Hello World example to compile, running the program is sometimes problematic. An error appears when trying to run the program in the VM: "no suitable pipeline found" or "Graphics Device initialization failed for : d3d, sw", as shown in this screenshot. It happens on both macOS and Windows 10 machines.

The "no suitable pipeline found" or "Graphics Device initialization failed for : d3d, sw" error when running the JavaFX program in the Virtual Machine.
The possible reason: The problem appears to happen more often on machines that have iCloud (macOS) or OneDrive (Windows) synchronization set up, although it also sometimes happens when no cloud service appears on the students' machines.
Suggested solutions
Suggestion 1: start a fresh project
The first suggested solution is to close all your projects in IntelliJ, shut the program down and start a JavaFX project from scratch, carefully following the tutorial, step by step.
While this might seem like a waste of time (you did do it right the first time, right?), it's surprising the number of times that we skip or misunderstand a step in our rush to just get it done.
Suggestion 2: Turn off iCloud or OneDrive storage
Relying on an internet connection to store your files is problematic due to synchronization and lag issues. It appears that the Java Virtual Machine doesn't play nicely with cloud-stored files. So, either
- turn off (remove) OneDrive or iCloud backups/synch or
- isolate your IntelliJ installation (executables, JDK and JavaFX SDK) to your local hard drive
Consult with the documentation for your cloud synch software as to how to do this.
Suggestion 3: Fresh JDK 15 and JavaFX 15 on a local folder (macOS)
In the last part of the Feb 10 (afternoon) Zoom class (around 38 minutes into the session) we successfully walked a student through a fix to the problem on a macOS machine by having the student install
- Oracle OpenJDK 15
- JavaFX 15
on /Users/UserName/temp. The temporary folder was made via the macOS terminal (mkdir temp) and we verified the folder properties in the Finder afterwards to make sure that it was located at Macintosh HD * Users * UserName * temp. There was no "iCloud" in the path.
We are assuming that IntelliJ is installed on the local hard drive in the Applications folder. If it isn't, consider uninstalling IntelliJ and reinstalling it in the default, local, Applications folder and that the project files are being stored on Macintosh HD * Users * UserName * IdeaProjects. (Within IntelliJ it refers to this as ~/IdeaProjects, which is normal because the ~ refers to the user's home directory)
To install OpenJDK we started a new project in IntelliJ and used IntelliJ's internal installation system to place it on the student's machine. We chose the Oracle OpenJDK version 15. At the same time we downloaded the "Latest Release" of the JavaFX SDK (15.0.1 as of Feb 2021). We placed the JavaFX SDK folder (javafx-sdk-15.0.1) in /Users/UserName/temp.
We continued to follow the steps for setting up the JavaFX Hello World project on the JetBrains tutorial page. When it came time to link the JavaFX library ("Add the JavaFX Library step") we pointed to /Users/UserName/temp/javafx-sdk-15.0.1/lib and added that to our "hello world" JavaFX project.
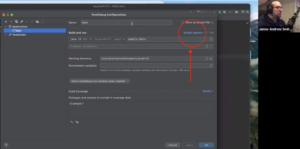
At the "Add VM Options" stage we went to Run | Edit Configurations to tell IntelliJ how to tie in the VM (Virtual Machine). When you are in Edit Configurations, it might not be entirely clear where to do this because the text box to enter the VM options isn't always in the same place. In the latest version (3) of the 2020 Community Edition of IntelliJ you access it from a "Modify Options" menu, shown here:
With JDK 15 and JavaFX 15, the text you combine two bits of text from the section of the JetBrains tutorial page (following the same suggestions for JDK 14 and JavaFX 14)
--module-path /path/to/javafx/sdk --add-modules javafx.controls,javafx.fxml --add-exports javafx.graphics/com.sun.javafx.sg.prism=ALL-UNNAMED
where /path/to/javafx/sdk/ should be /Users/UserName/temp/javafx-sdk-15.0.1/lib, assuming the the version of the JavaFX SDK is still 15.0.1. If it isn't, change the folder name.
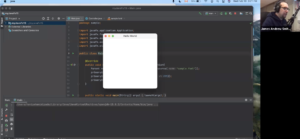
We then finished with the JetBrains tutorial, compiled and ran Hello World, with the application window appearing as shown here:
Many thanks to Haniyeh, Eric and others for helping on the Zoom call.
Suggestion 4: Make sure that you use the default installation locations (Windows 10)
If you use the external installer for the Adopt Open JDK (Java SDK, not JavaFX) make sure that you use the default, non-cloud installation folder. As one student found out, when the JDK was installed in a custom folder the
The student managed to fix the issue by uninstalling JDK and reinstalling it in the default install location that was automatically chosen by the JDK installer. On his Windows 10 PC was C:\Program Files\AdoptOpenJDK\jdk-14.0.2.12-hotspot\bin\java.exe
--module-path /path/to/javafx/sdk --add-modules javafx.controls,javafx.fxml
This suggestion comes to us courtesy of Lion Zhu, a student in our class.
Other suggestions
We suggest searching the IntelliJ user forum (IntelliJ IDEA Users Forum) at JetBrains for other suggestions. Prior to posting your request for help, make sure that you search for and read any and all relevant posts about the problem. If there is already a post about it, consider adding to that thread rather than starting a new one. For instance, here are all the JavaFX posts .
There is a suggestion at Eden Coding to use Maven to install and run JavaFX projects. We haven't tried it out, but it may also be worthwhile examining.
James Andrew Smith is an associate professor in Electrical Engineering and Computer Science Department in York University's Lassonde School. He lived in Strasbourg, France and taught at the INSA Strasbourg and Hochschule Karlsruhe while on sabbatical in 2018-19 with his wife and kids. Some of his other blog posts discuss the family's sabbatical year, from both personal and professional perspectives.


