There are a large variety of computing services and facilities that aid teaching and research at York. Learning Technologies are for faculty who are interested in using technology to support, supplement or enhance their teaching. Learning Technology Services (LTS) supports faculty and researchers with using the technologies, and the help center provides assistance with set-up and troubleshooting.
Featured Services
Overview:
eClass is a web based course management system that is powered by moodle and allows faculty to create and manage online content for their courses. eClass can also be used to host online discussions, quizzes, and audio-visual materials for courses at York.
How do I access it?
eClass requires your active Passport York username and password.
You are automatically assigned to your eClass courses based on information in Academic Resource Management System (ARMS). If you are YUFA, you will be assigned to your courses the day after you are assigned in ARMS, and for CUPE, you will be assigned, the day after the acceptance of your offer has been recorded in ARMS. If you would like access prior to your course assignment being recorded in ARMS, please send us an email to askit@yorku.ca with the course information.
If you want to use eClass for non-academic purpose, please use the request form to have your non-academic course set up.
Overview:
iClicker is the university supported solution for engagement through polling. iClicker promotes active learning in the classroom by allowing students to easily respond to questions with their own personal devices and receive instant feedback. The service is free to use and is available to every member of the York University community.
Features:
- Use for polling and quizzes
- Multiple choice, numeric, short answer and target questions
- Sync grades with eClass
How do I access it?
Overview:
York University strives to maintain the highest level of academic integrity and the accompanying policy available below, states that plagiarism will not be tolerated.
Turnitin has released a major product upgrade called Turnitin Feedback Studio, which is a more streamlined user interface of the product while maintaining all of the functionalities of Turnitin. Text-matching software, such as Turnitin, can be used to detect plagiarism by assisting instructors to determine the percentage of text from a student assignment that matches text from:
- Student papers previously submitted to Turnitin.
- Similar material submitted to public websites.
- Journal articles, periodicals and commercial databases.
How do I access it?
If you are already using eClass for your course we have a built in Turnitin integration, allowing you to set up assignments, have students submit and grade assignments all from within eClass. The benefit is that there is no need to have a separate account created for you or your students. You can find information about how to set up a Turnitin assignment in eClass here.
If you are not using eClass, you can also create Turnitin assignments via Turnitin’s web-based service at: https://www.turnitin.com/
If you’d like to proceed with this stand-alone option, send an email to Learning Technology Services at ltshelp@yorku.ca with the following information so that we can set you up with an account and send you instructions on how to get started:
- First name
- Last name
- York email address
The Instructor Quick Start Guide will quickly help you log in, and create your Turnitin assignment.
Use the Instructor Guide for detailed information, including managing classes and grading submissions.
Enrolling students:
Students can either enroll in your class by creating a user profile and using your class ID and password, or you can add students to the class yourself.
- Give your students the class ID number and enrollment password for your course.
- Inform students to use the Student QuickStart Guide to create their account and access their assignment.
Direct your students to the Turnitin Assignment Submission page for detailed information.
Additional Resources:
Turnitin interactive demo>>
York Academic Integrity website>>
Overview:
York University offers lecture recording resources to faculty and staff for use in enhancing and supplementing their teaching.
Panopto – York’s primary tool for recording on on-demand content from classroom, offices or your home and which can be automatically published (if you wish) into your eClass course.
Zoom – The primary tool for synchronous meetings for your courses that can also be recorded (with or without meeting participants) and included in your eClass course.
Look up your classroom to determine if you may need a microphone loan to use Panopto or Zoom>>
How do I access it?
Panopto is York University’s supported solution for lecture capture.
This service is available to all York University faculty and staff members who would like to use lecture capture to enhance and supplement their teaching. Panopto is available on built-in computers in lecture halls throughout the Keele and Glendon campuses. If you do not find it on a qualifying computer, please contact askit@yorku.ca to inquire about the possibility to have that room enabled for future use.
How to use it?
Our Getting Started with Panopto guide will walk you through steps on how to get Panopto and start using it in your course.
Zoom allows you to record at home. Click here to learn more about Zoom>>
Available Rooms:
| Room | Capacity | Seating | Room Details |
|---|---|---|---|
| VH 3006 | 59 | Classroom, Seating - Moveable | Chalkboard, Blackout Drapes/Blinds, Floor, Carpeted, Furniture, Lectern/Podium, Windows |
| VH A | 301 | Theatre, Seating - Fixed | Chalkboard, Furniture, Accessible Seating (6), Furniture, Adjustable Table (2), Furniture, Lectern/Podium, Furniture, Single Chairs (6), Furniture, Theatre Type Seating (295) |
| VH B | 206 | Lecture Hall, Seating - Moveable | Chalkboard, Furniture, Accessible Seating (4), Furniture, Adjustable Table, Furniture, Continuous Writing Surface, Furniture, Lectern/Podium, Furniture, Single Chairs (206) |
| VH C | 199 | Lecture Hall, Seating - Moveable | Chalkboard, Furniture, Continuous Writing Surface, Furniture, Lectern/Podium, Furniture, Single Chairs (199) |
| VH D | 135 | Lecture Hall, Seating - Moveable | Chalkboard, Furniture, Continuous Writing Surface, Furniture, Lectern/Podium, Furniture, Single Chairs (135), Not Wheelchair Accessible |
| DB 0005 | 75 | Lecture Hall, Seating - Moveable | Chalkboard, Furniture, Continuous Writing Surface, Furniture, Lectern/Podium, Furniture, Single Chairs (75) |
| DB 0006 | 100 | Lecture Hall, Seating - Moveable | Chalkboard, Furniture, Continuous Writing Surface, Furniture, Lectern/Podium, Furniture, Single Chairs (100) |
| DB 0007 | 75 | Lecture Hall, Seating - Moveable | Chalkboard, Furniture, Continuous Writing Surface, Furniture, Lectern/Podium, Furniture, Single Chairs (75) |
| DB 0010 | 100 | Lecture Hall, Seating - Moveable | Chalkboard, Floor, Carpeted, Furniture, Continuous Writing Surface, Furniture, Lectern/Podium, Furniture, Single Chairs (100) |
| DB 0014 | 100 | Lecture Hall, Seating - Moveable | Chalkboard, Extra Chalkboard, Furniture, Continuous Writing Surface, Furniture, Single Chairs (100) |
Additional classroom support: If you require any additional equipment or technical support please submit your request through our online order system - http://ceo.yorku.ca
Overview:
The Class Lists service is part of SIS (Student Information System) allows Faculty members, course directors, departmental administrative assistants, and class instructors to view student enrolment lists for their courses.
Features:
- Use of Class List application requires authentication by Passport York.
- The instructor's authorization to view the class list is determined by the instructor's name attached to the class in the Course Offering System (COS), within the Student Information System (SIS) database.
- The course director's authorization is determined by the name at the course level, in COS, within the SIS database.
- Admin. Assistants are granted authorization by a table maintained by the Registrar's Office.
- The Class List is only available for the previous, current, and subsequent academic years.
Availability:
- Class List service is available 23 X 7, from 1:00 a.m. until midnight - except during maintenance outages. In the event of a scheduled downtime, notification is given typically 1 week in advance, except during emergency downtimes, when every effort will be made to notify the user community as early as possible.
- Class Lists are available on the online, with connectivity to the York University Network.
How do I access it?
- The Class List service can be found at classlist.yorku.ca
- **Please note you will need your Passport York login to access the service.
Overview:
Grades Input on the Web (GAM) allows course and section directors to input or upload grades.
How do I access it?
- Log in at Grades Input on the Web (GAM) using your Passport York username and password.
- If you can log in to Class Lists you should also have access to Grades Input on the Web.
- If you cannot log in Class Lists,
- SB, ES, LW instructors, contact your Faculty office for student and academic services.
- For all other instructors, send an email to yugrades@yorku.ca with your name, Passport York username, employee number, Faculty name, department name and office telephone number.
- If you are an administrative support staff member, send an email to yugrades@yorku.ca with your name, Passport York username, employee number, Faculty name, department name and office telephone number. The Registrar’s Office will contact your Faculty SIS Account Manager for approval and advise you when your access has been arranged.
For more help access the SIS home page or contact yugrades@yorku.ca
Overview:
During the period where course evaluations are open. Students will get announcements on my.yorku.ca to remind them to evaluate their courses. Completing the brief evaluation survey is a simple alternative to evaluations done on paper.
How do I access it?
Frequently Asked Questions
Classroom Technology FAQs
York courses in equipped rooms have free use of the technology that is installed. Courses in un-equipped rooms are charged a small fee for PCs; most other equipment is free. Special requests, recordings or operators are also charged back to your department. View the price list.
Requests in CEO for the upcoming academic year (September 1 to August 31) can be made after 2nd week of August.
All CEO orders are required to be in the system five business days before equipment is needed.
For student presentations, students should request the equipment through their instructor five business days before equipment is needed.
eClass FAQs
We use authoritative information on 'who's teaching what' from our Academic Resource Management System (ARMS). Once you've been assigned to teach a course there, you will be added to your course automatically.
Adding a topic when using Topics format:
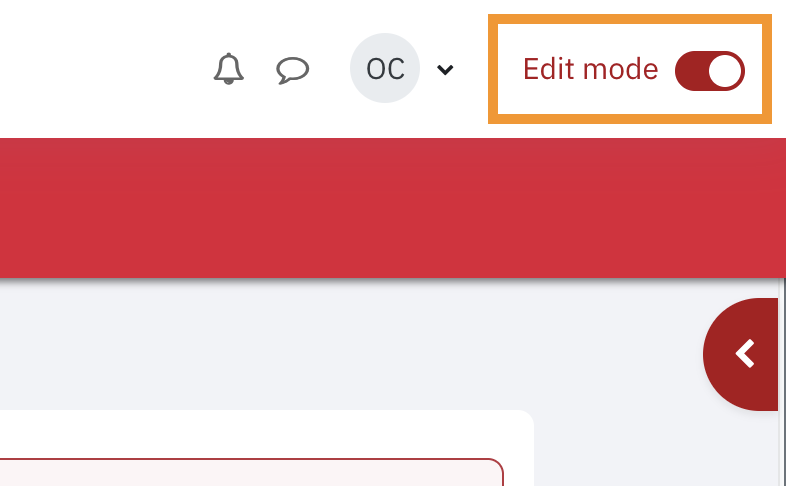
- While on your main course page turn Edit mode on
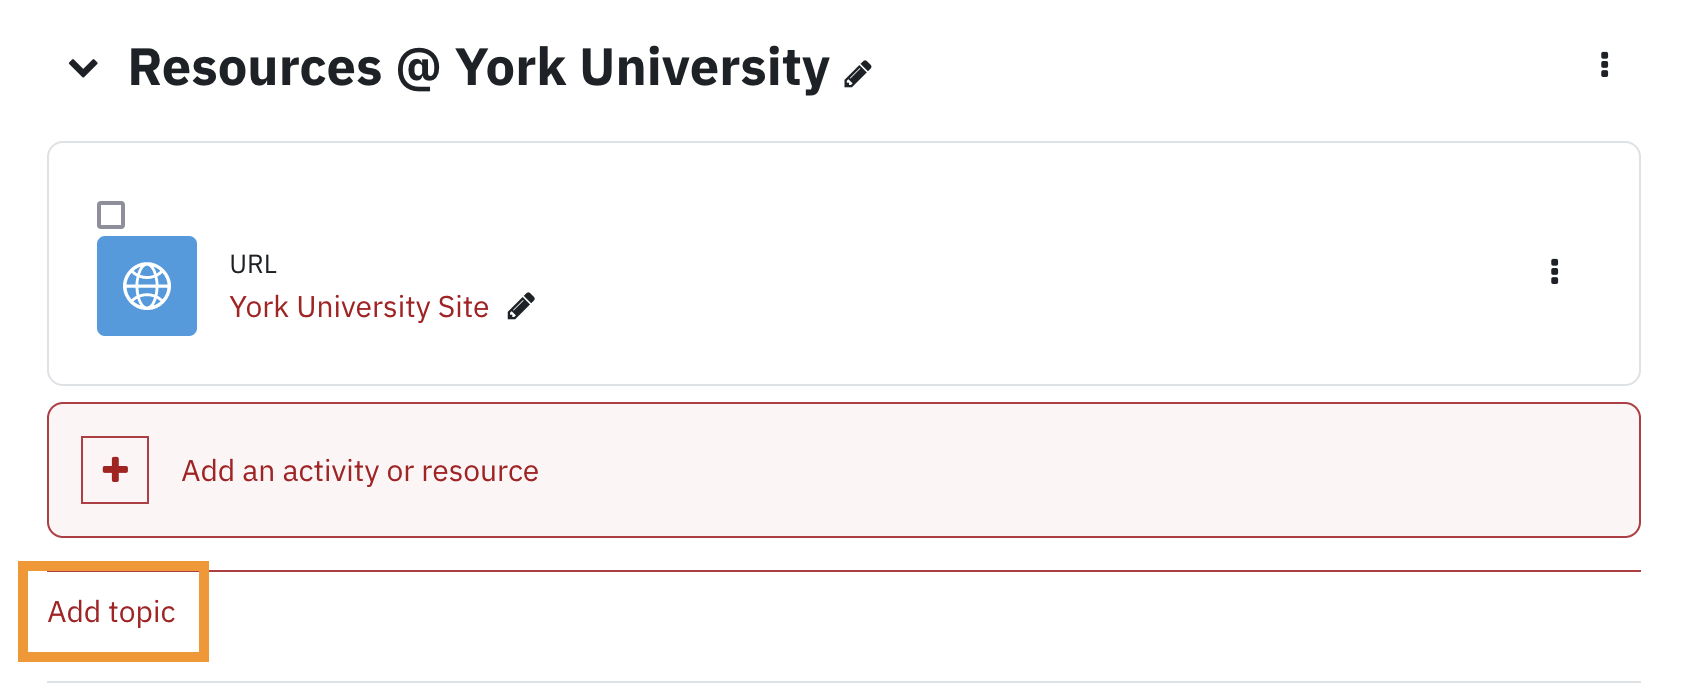
2. Scroll to bottom of the section after which you wish to add a new topic and click Add Topic.
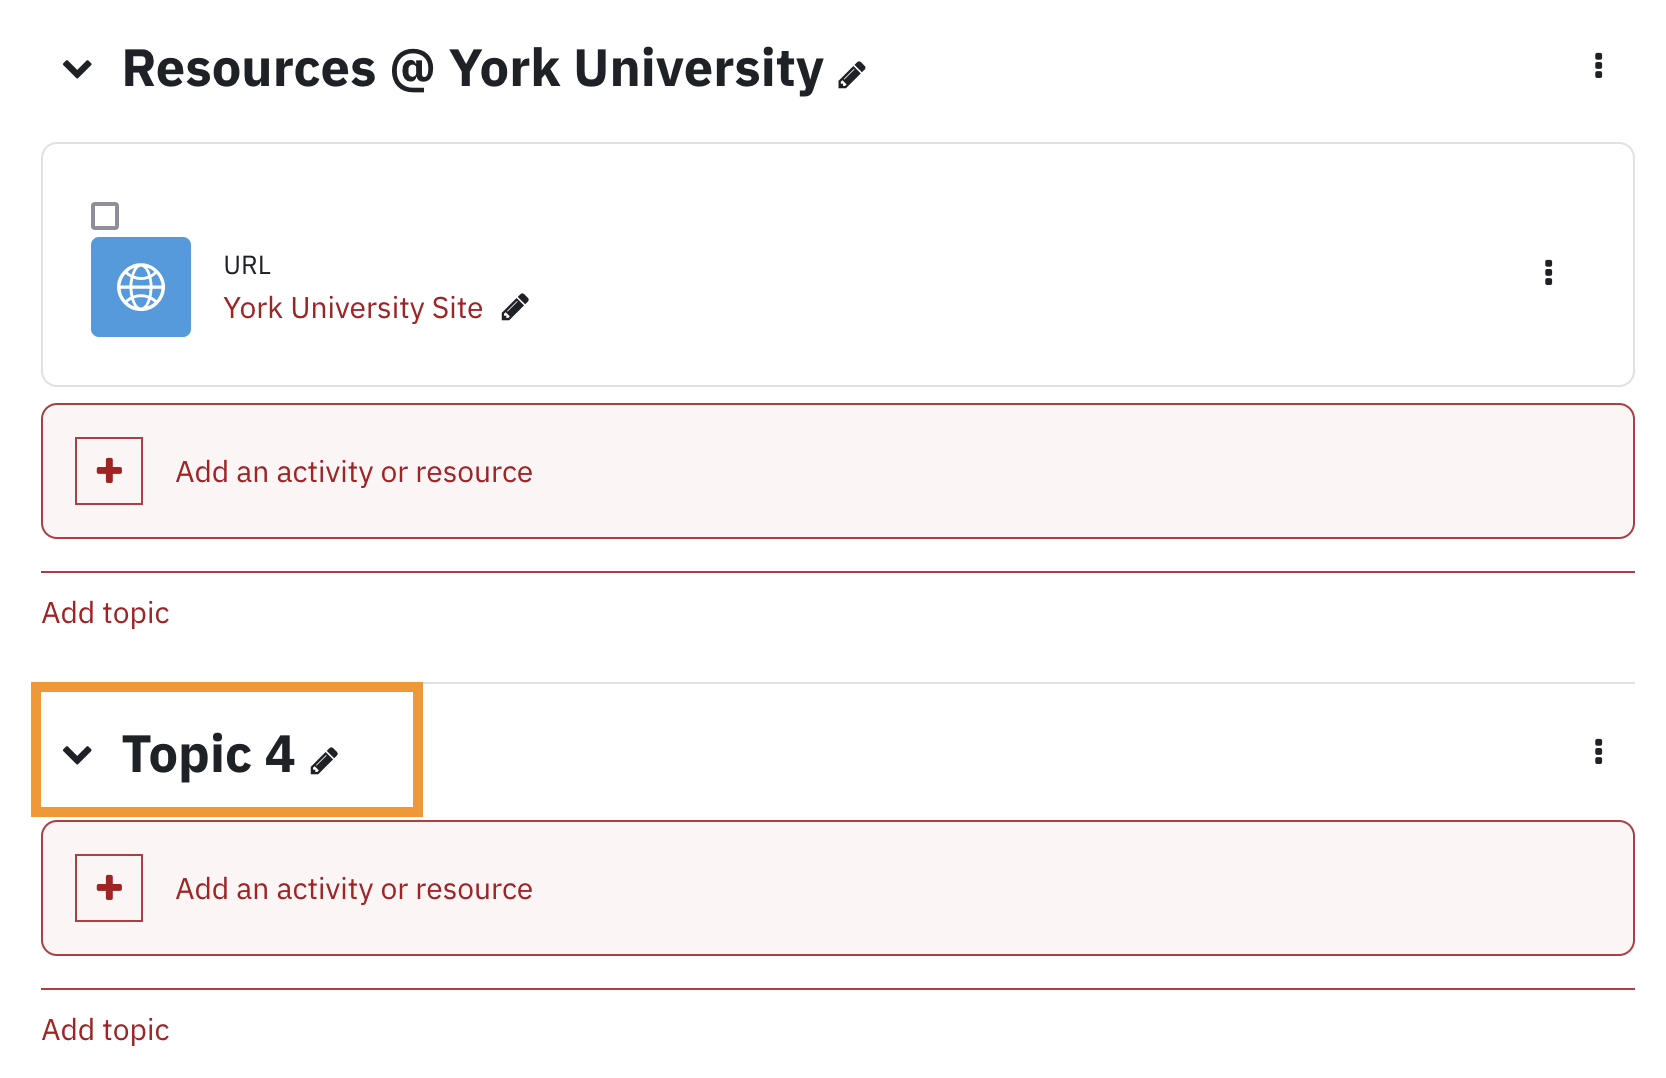
3. A new topic will be added.
Adding a week when using Weekly format:
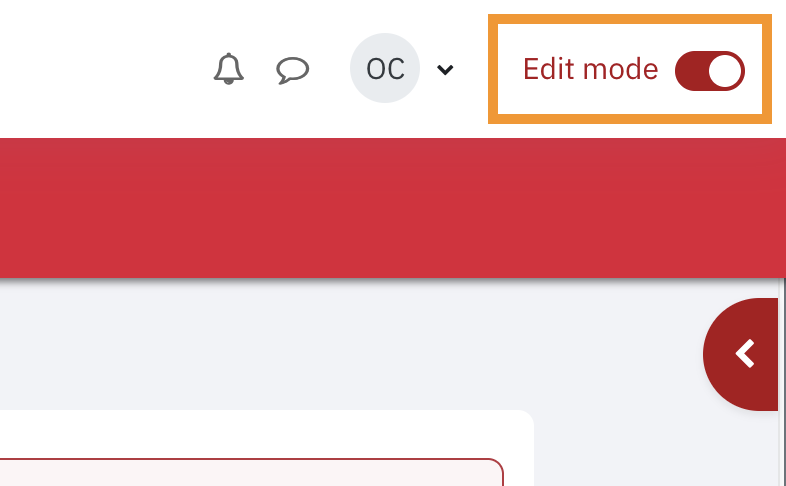
- While on your main course page turn Edit mode on
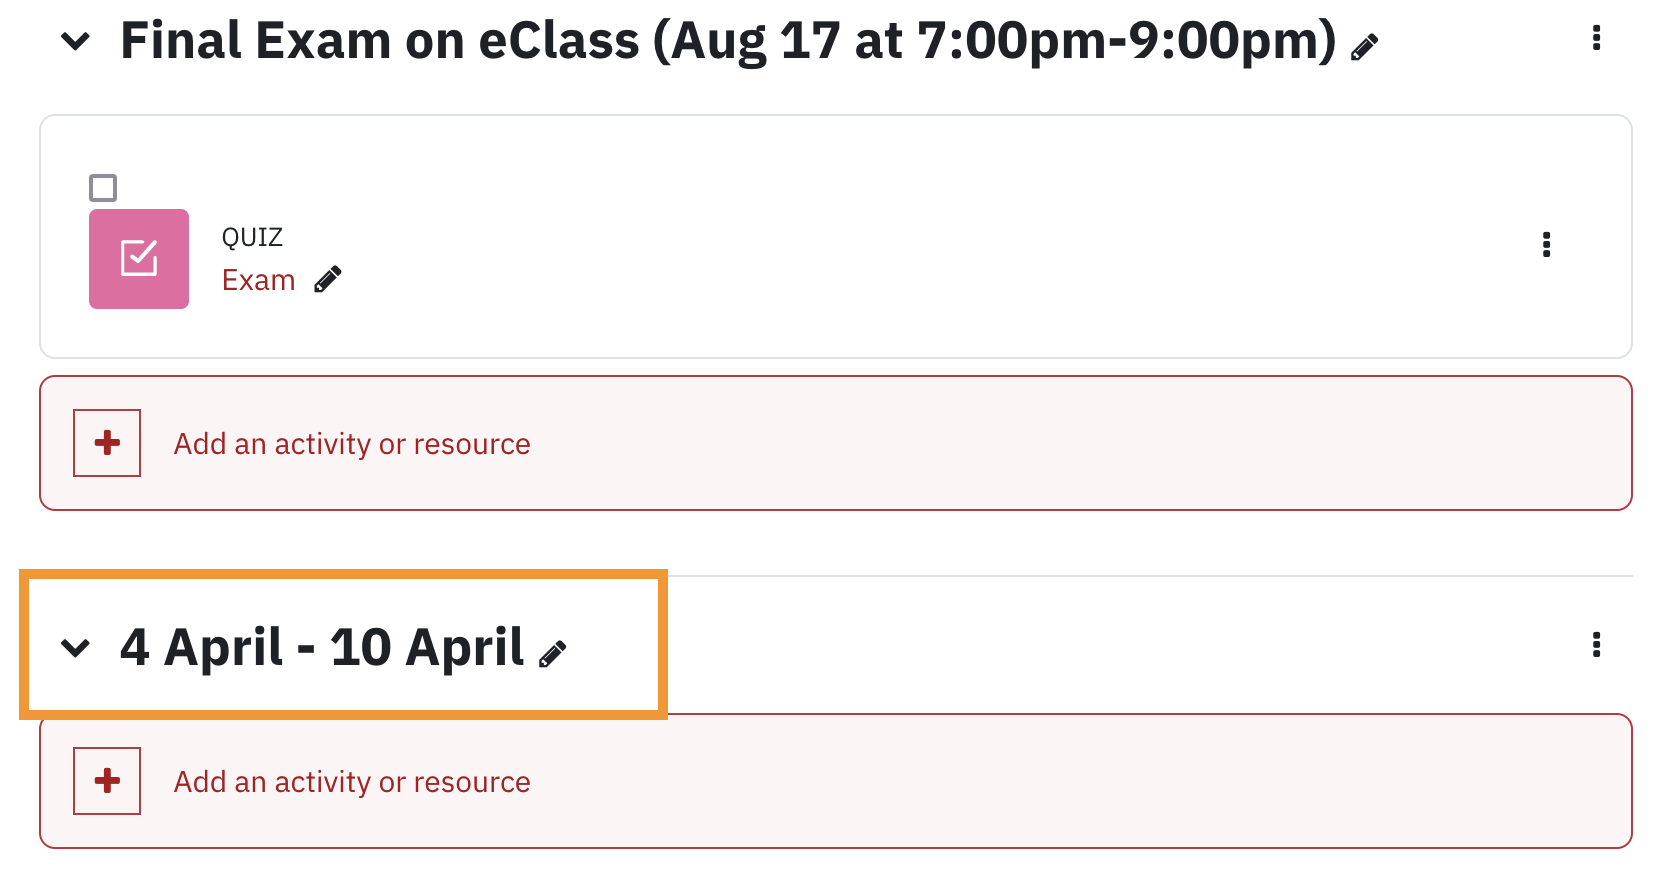
2. Scroll to bottom of your course page and click Add Week.
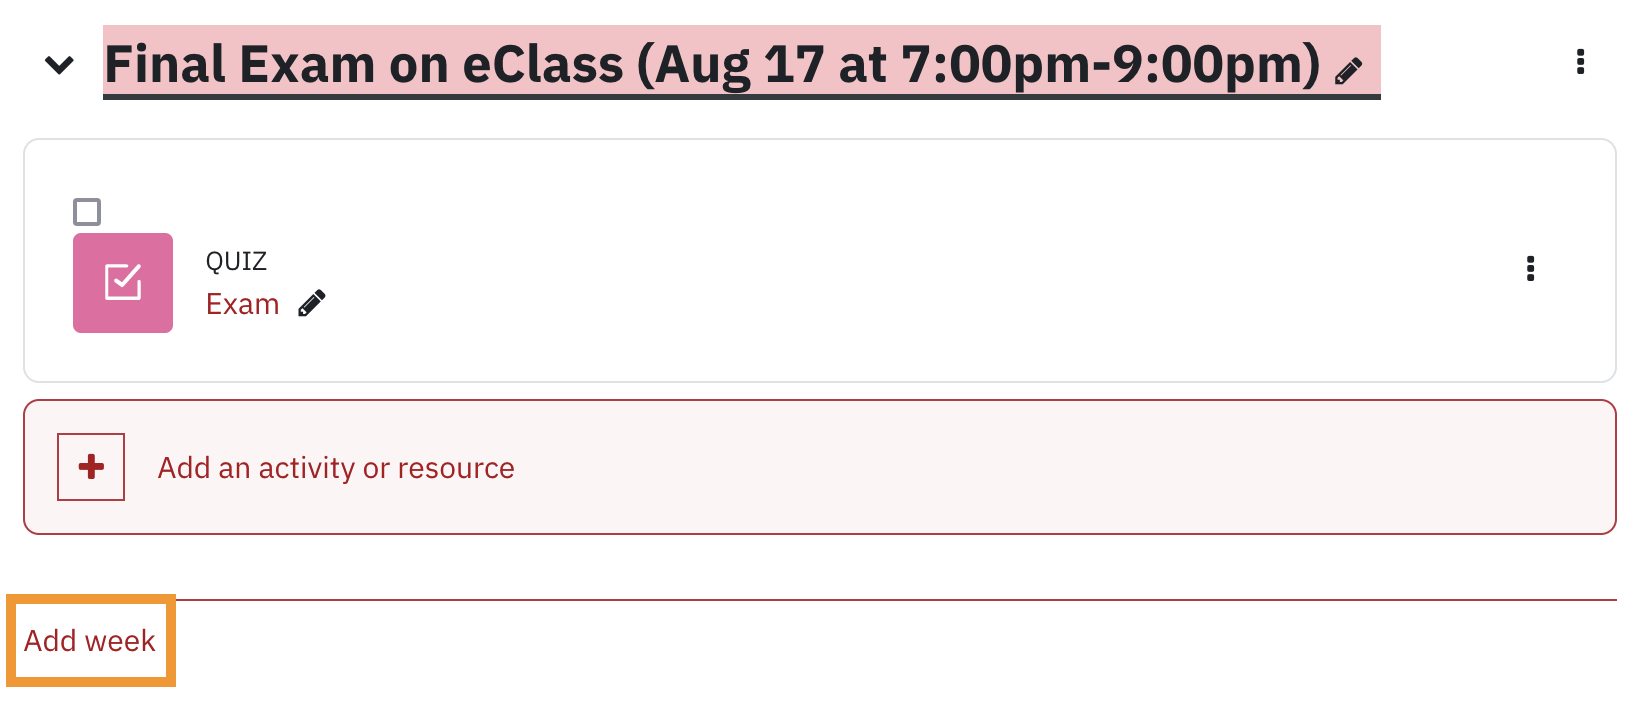
3. A new week will be added.
You can switch your role to a student role to take a look at your course page through the eyes of a student.
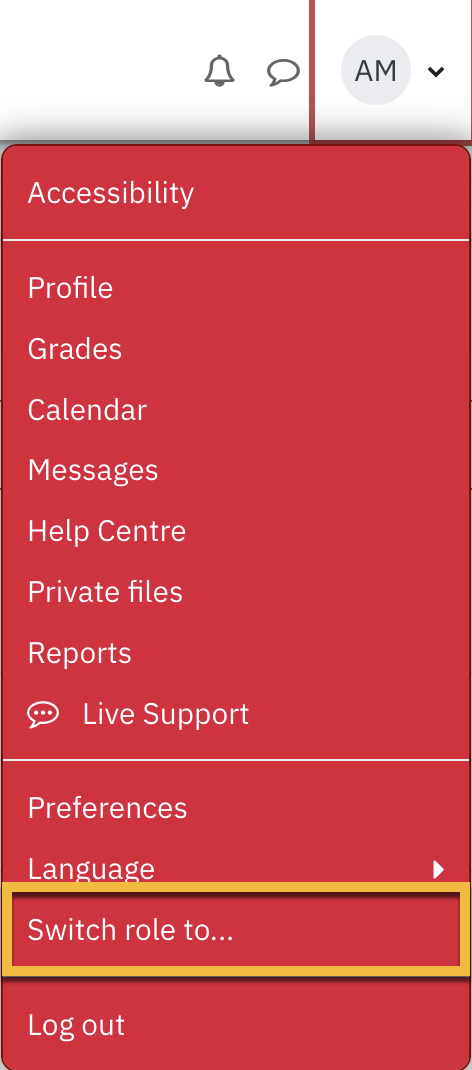
- Click your name on the top right corner of the page
- From the drop-down menu, select Switch role to...
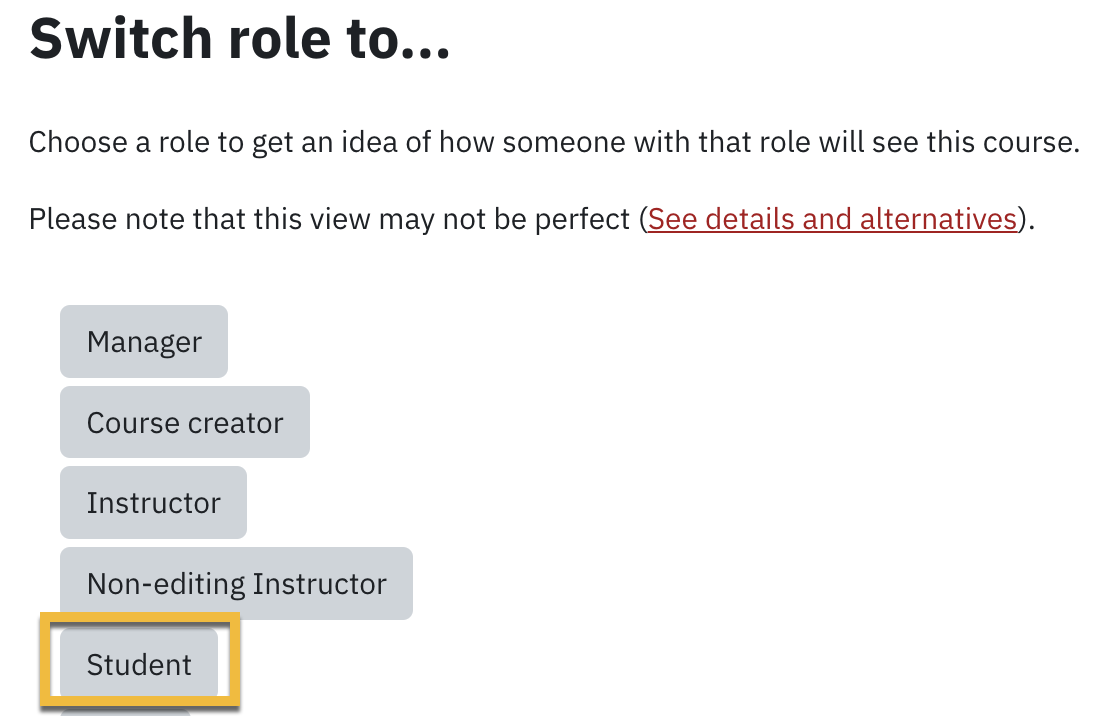
3. Select 'Student'.
4. When you are ready to return to your own role select Return to my normal role by clicking your name in the top right corner of the page.

For eClass related inquiries, please contact your faculty technical support group as listed below.
School of the Arts, Media, Performance and Design
ampdtel@yorku.ca
Faculty of Education
helpdesk@edu.yorku.ca
Faculty of Environmental & Urban Change
fescomp@yorku.ca
Faculty of Health
hh-help@yorku.ca
Faculty of Liberal Arts & Professional Studies
esohelp@yorku.ca
Lassonde School of Engineering
ask2lit@lassonde.yorku.ca
Osgoode Hall Law School
help@osgoode.yorku.ca
Faculty of Science
fscits@yorku.ca
If your faculty is not listed above, please contact UIT Learning Technology Services at askit@yorku.ca.
If your students have eClass related questions, please advise them to contact faculty technical support groups as listed above, or to contact askit@yorku.ca if their faculty is not listed above.
An instructor has the option to deliver a quiz and delay the release of grades until it is convenient to do so. This process allows an instructor to review quiz attempts, and ensure that all students have completed the quiz. If the quiz is hidden on the course home page, remember to make it visible in addition to the steps below to release quiz grades.
- Click on Quiz Title
- Click on the blue cogwheel icon to the right
- Select Edit settings from the drop-down menu
- Scroll down to the Review options
- Under column heading After the quiz is closed, select checkbox for Marks
- Scroll down and click Save and return to course
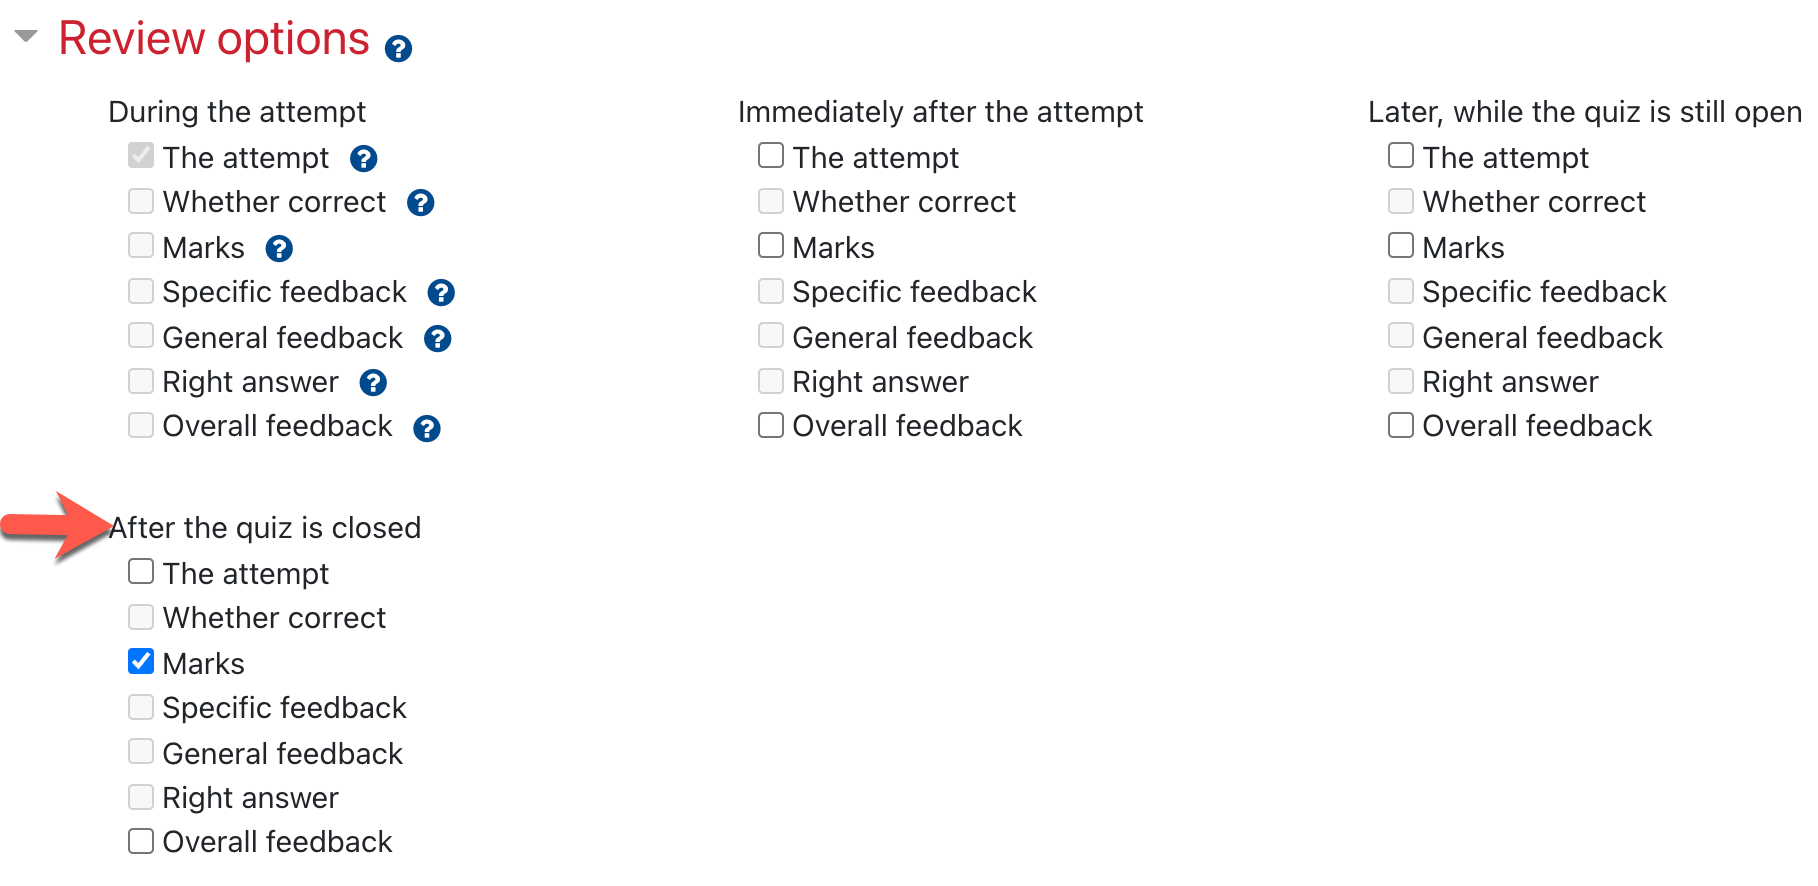
Upon release, the grades are automatically added to the gradebook. Students then have the option to click on the quiz title or the gradebook to see their grade.
The Forum activity allows instructor to grade students' postings. Add the Forum to your eClass course, choose the grading type and grading method under the Whole Grading Forum section. Each student postings is compiled one page to make it easy to assess the student participation in the activity. The grading workflow is outlined below.
- Click on the Forum title from your course homepage
- Click on the Grade users button located on the forum topic page.

3. On the right, click on the magnifying glass to search and select a user.

4. Student postings are compiled on the page for the instructor to assess
5. Enter a grade
6. Click Save and proceed to grade another student.
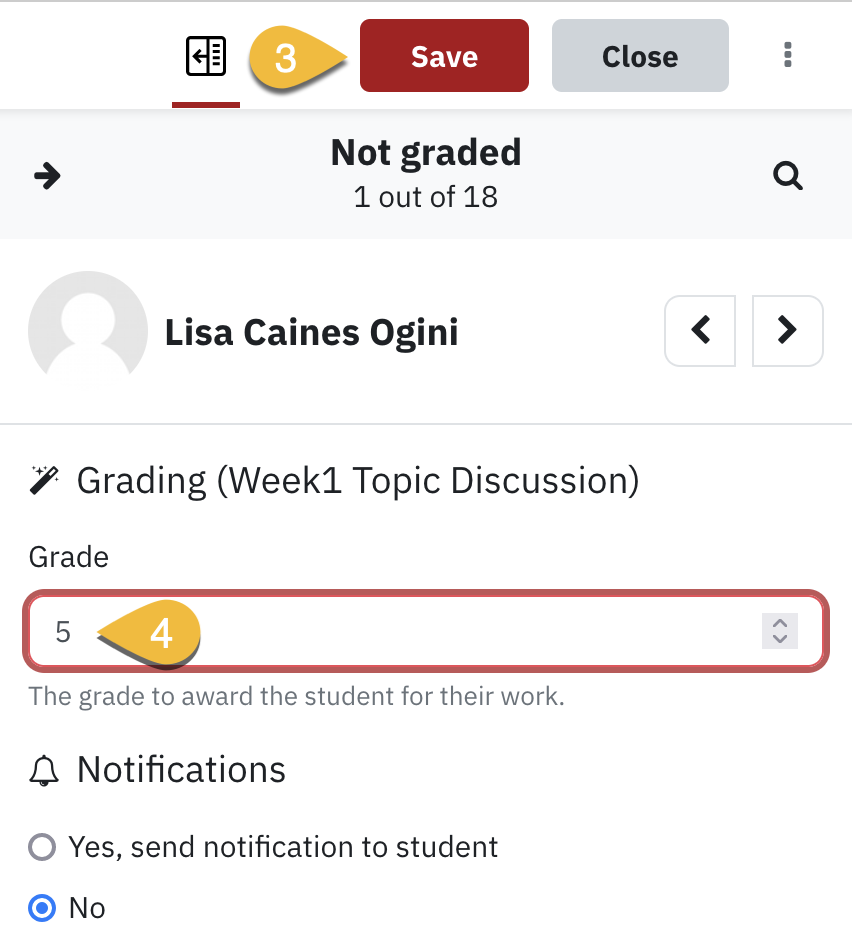
7. The grade entered for each student is pushed automatically to the gradebook.
The Feedback activity allows you to create evaluations, surveys, or questionnaires within your eClass course. Unlike the Survey activity, which is pre-populated with questions, the Feedback activity allows you to create your own questions. It is suitable for informal evaluations within the course and/or non-graded feedback. The results of the Feedback can be viewed in detail or as a graph with an overall summary.
Follow the steps below to add the Feedback activity to one or more of the sections of the course.Enable Edit mode on at the top right of the course home page.
1.Enable Edit mode on at the top right of the course home page

2. Click Add an activity or resource in the section where you would like the feedback survey to be listed.

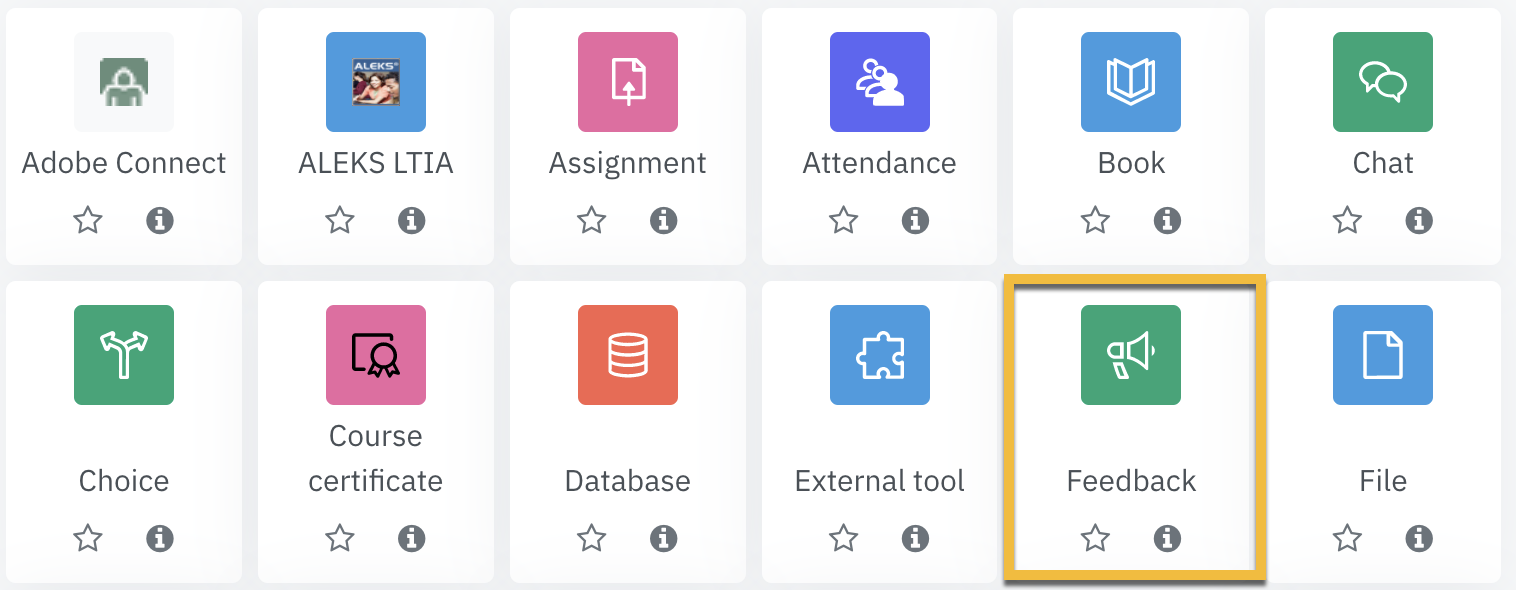
3. Select Feedback in the pop-up under Activities, and then click Add. The Assignment settings page appears.
Click Expand all to expand each of the sections and reveal the options.
General
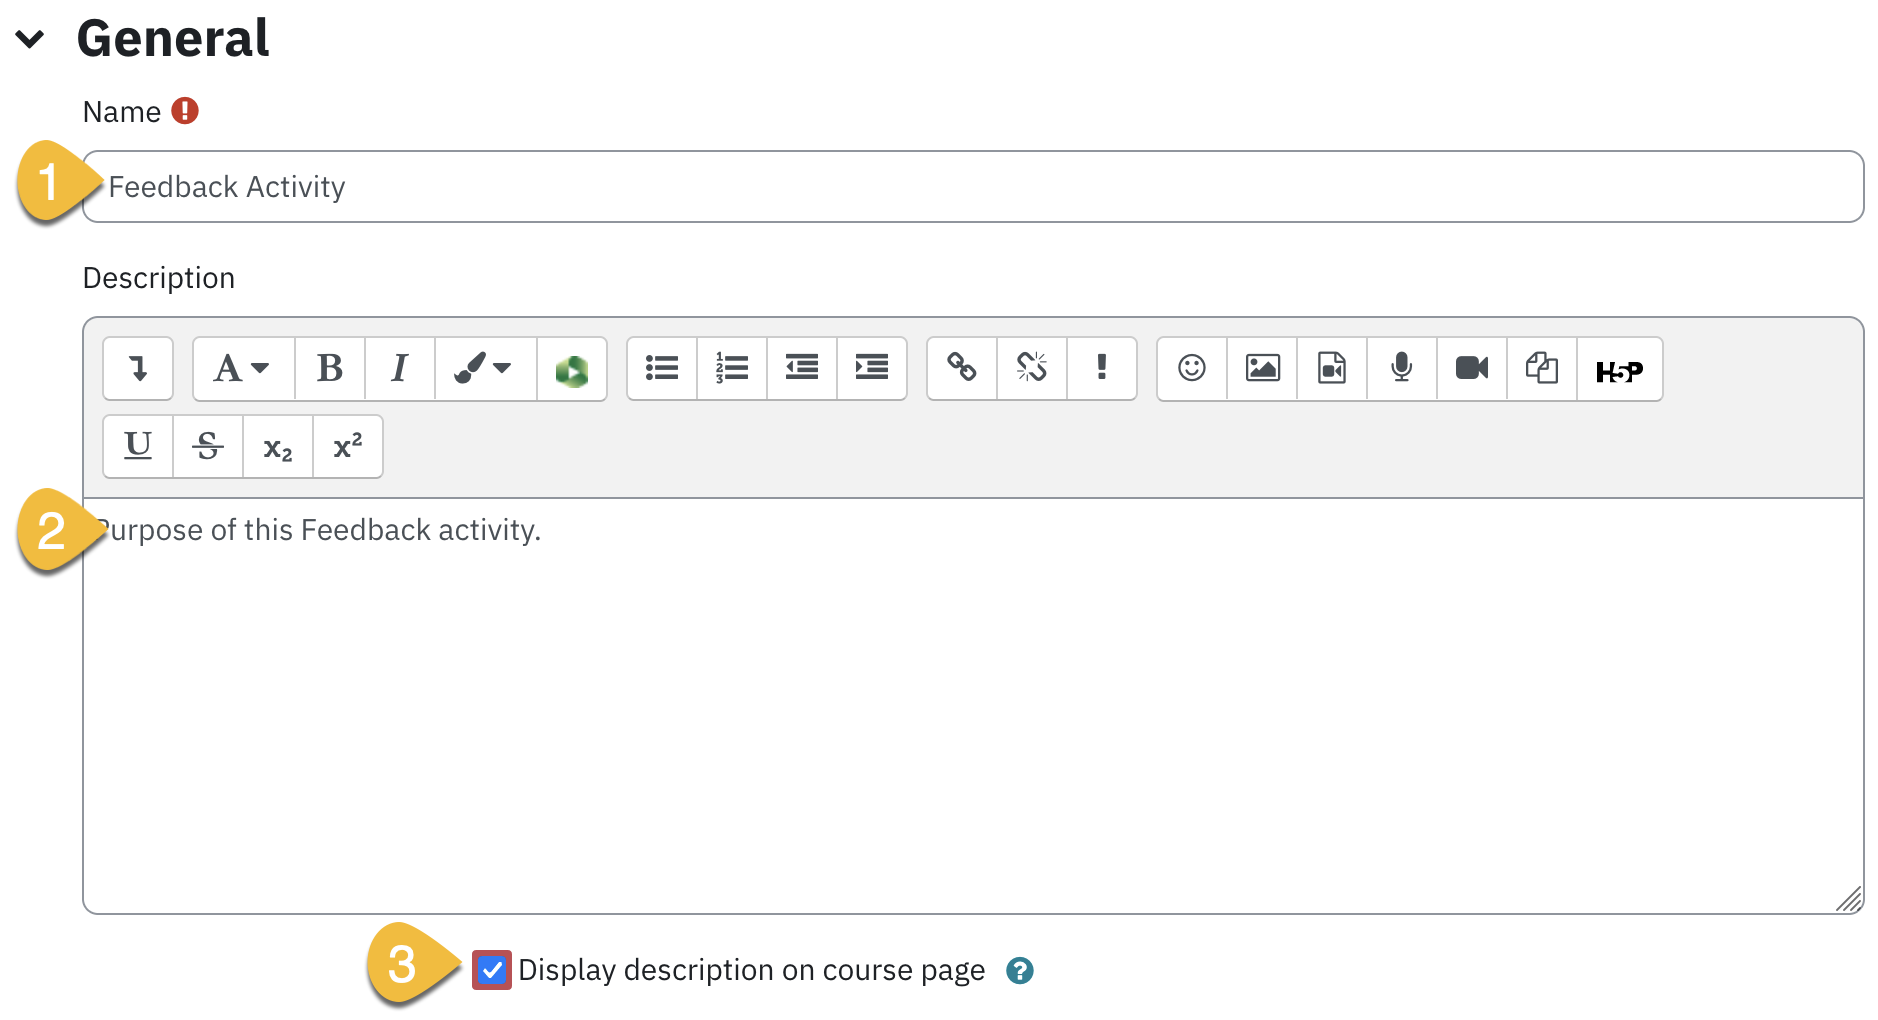
1. Enter a title in the Name field. This name will appear as a link to access the Feedback Activity on the course main page.
2. Enter a brief description about the purpose in the Description text box.
3. Place a check-mark next to Display description on course page check-box to make it visible on the course home page. The description will display directly below the activity link and on the Feedback activity's page.
Availability
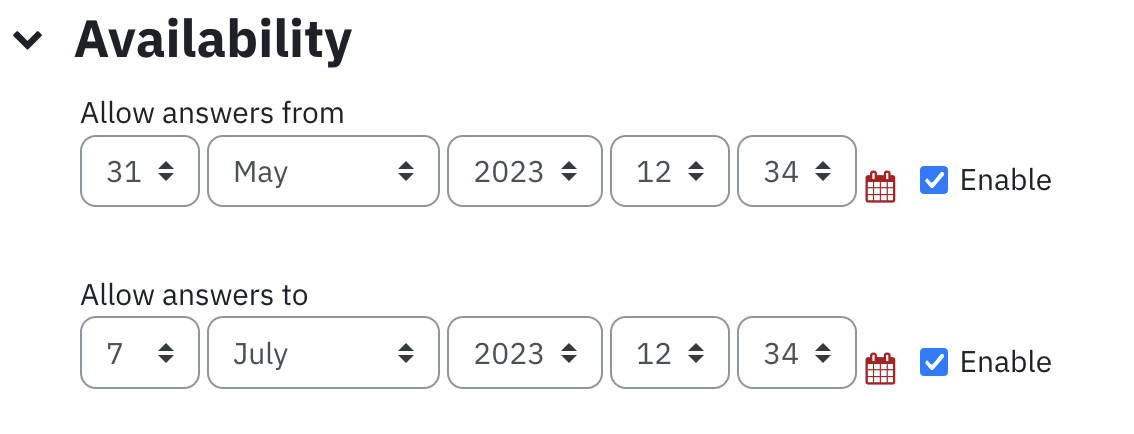
Availability indicates when users can participate in the Feedback activity. If dates are not required, students will be able to submit feedback once the Feedback activity has been created and remains available. To specify availability dates for the Feedback activity:
- Place a check mark in the Enable check box(es) next to Allow answers from/to drop-downs as required to enable availability.
- Select the date(s) and time(s) to make the Feedback available from the Allow answers from/to drop-down lists as required.
Questions and Submissions Settings
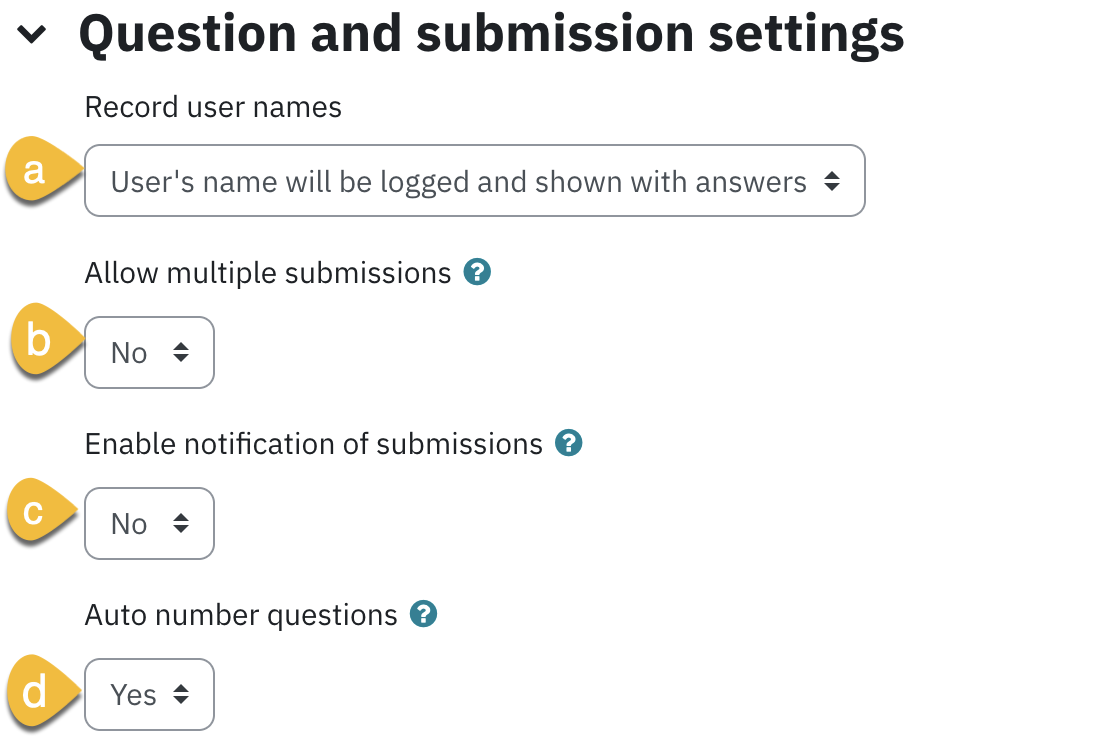
Choose the relevant options from the Question and submission settings section.
a) Record user names: Select anonymous if you would like the users' names to be hidden, or select Users's name will be logged and shown with answers to have names displayed with results.
b) Allow multiple submissions: If you selected Anonymous in record user names above, then selecting Yes here allows users to take the Feedback survey multiple times, and each submission will be included in the results.
If you selected User's name will be logged and shown with answers in record user names above, then selecting Yes here allows users to resubmit the Feedback, and only the most recent submission is included in the results.
Selecting No will limit all users to one submission.
c) Enable notification of submissions: Select Yes option for an instructor to receive an e-mail notification each time a course participant completes the feedback.
d) Auto number of question : select Yes from the drop-down menu. Each question will have a number indicating how many questions to complete the Feedback activity.
After Submission
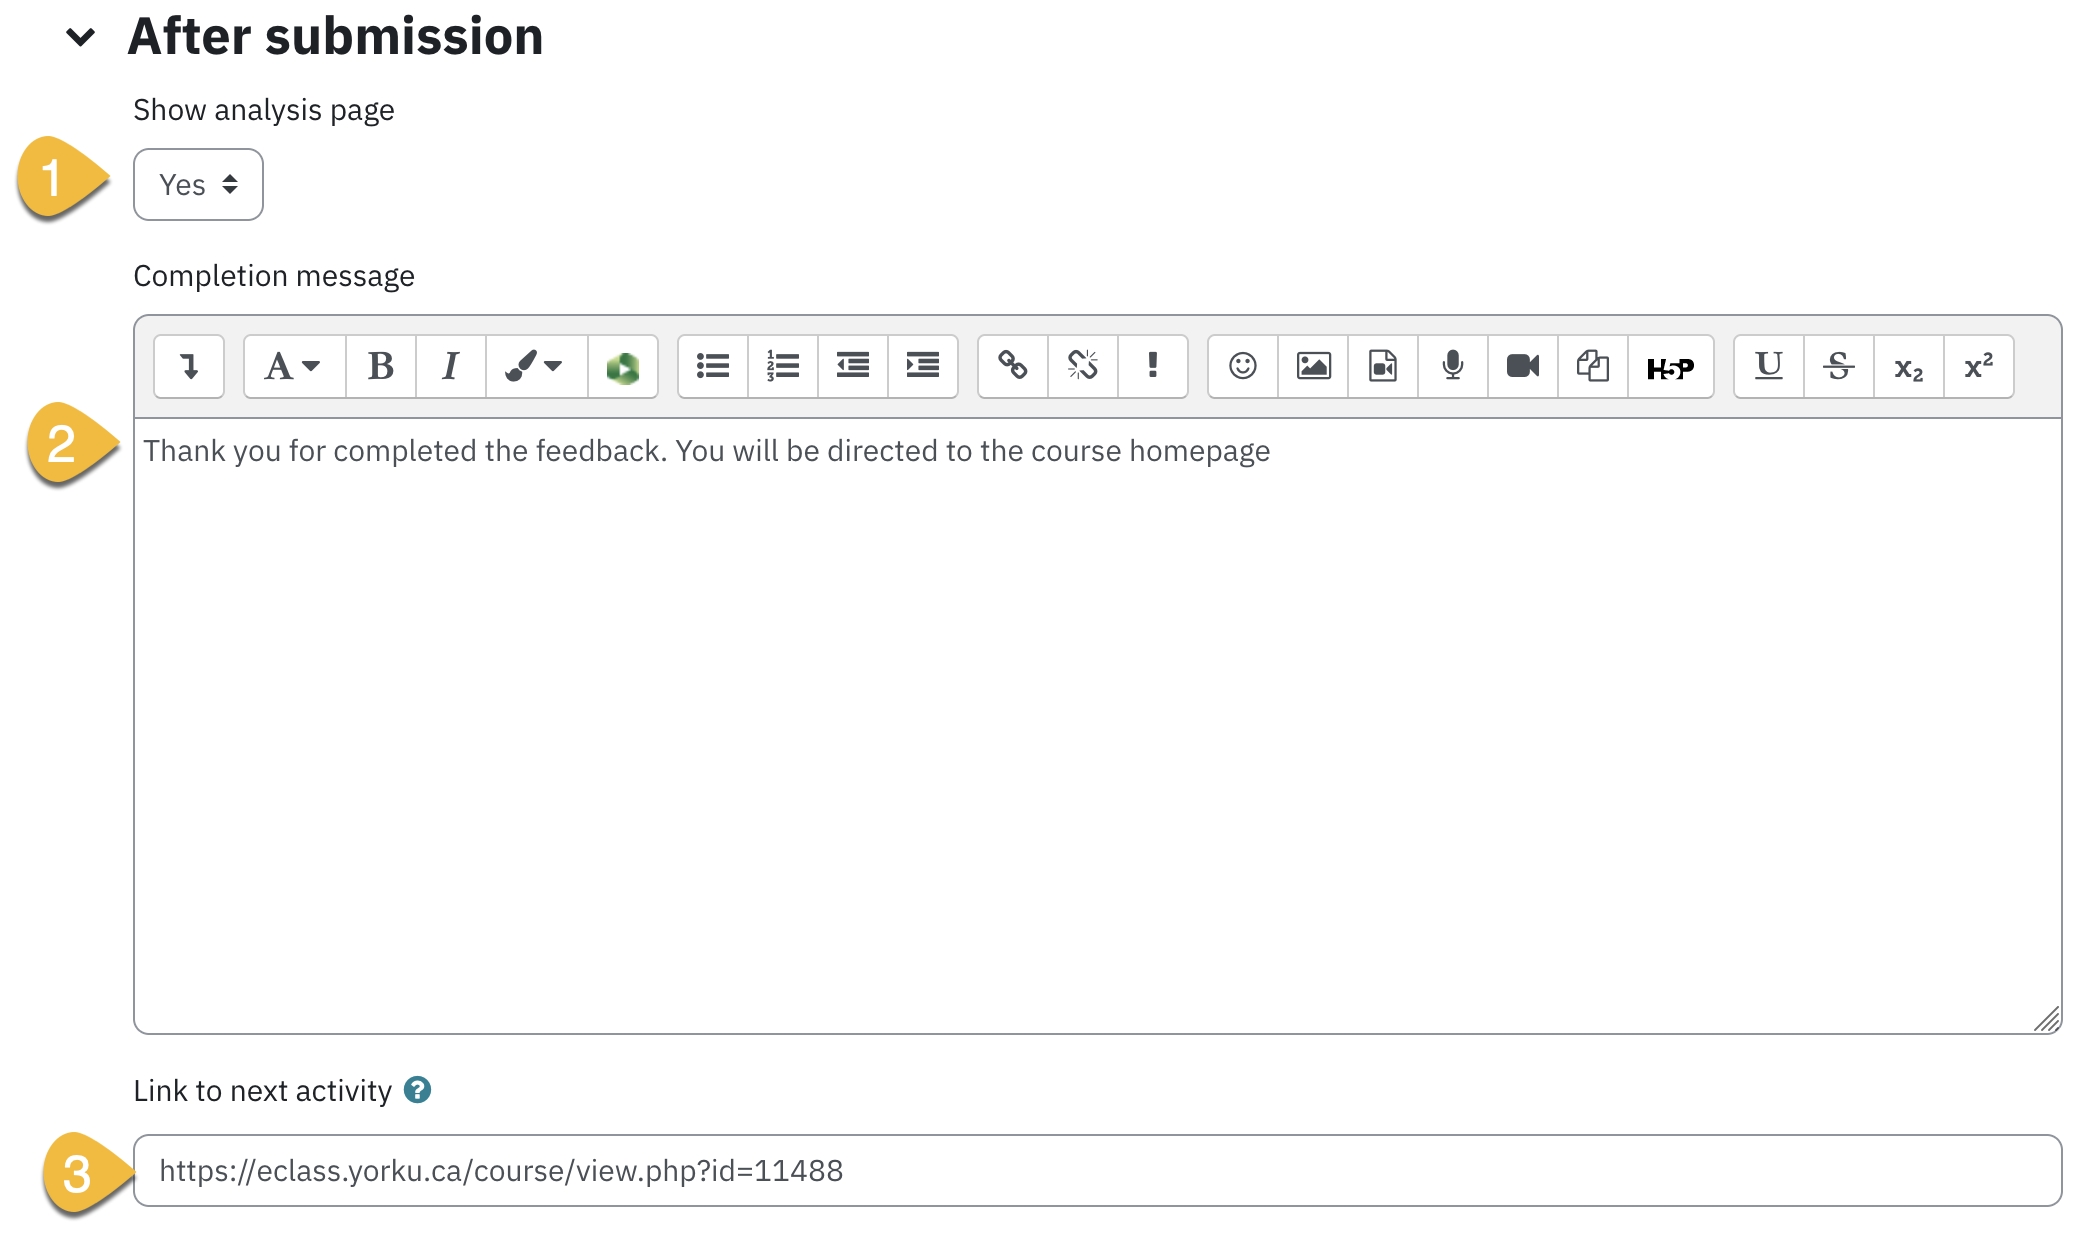
- Select Yes from the Show analysis page to allow participants to see the results analysis with data only. Students can access the "Submitted Answers" through a link on the Feedback Activity page.
- Type a message in the Completion message window to present to participants after completion of the activity.
- If you want participants to be directed to another Web page after completion, enter the URL in the Link to next activity field. You can enter the course website address, to help users navigate the course.
Common Module Settings
Establishing groups in a course is a separate process from that of creating activities groups will work with. Once groups have been configured in a course, they then need to be set for use on particular course activities, such as Assignments.
Select the appropriate group setting from the the Common module settings if groups have been configured in your course. Refer to the Creating Group Activities training page for setting up groups
Restrict Access
Restrict access options allow you to set restrictions on an activity or resource by date & time, or by conditions related to previous activities.
Set conditions for activity completion as required. Refer to the Restricting access to resource and activity training page for setting up restriction criteria.
Scroll down and click Save and display to add the activity and begin adding questions. You will be redirected to the Feedback settings page.
If you choose to Save and return to course, the Feedback activity will be created and a link will appear on the course main page. If you plan to add questions later rather than at the time of creation, you may want to hide the link to avoid user confusion.
To add questions to your Feedback activity, follow the steps below:
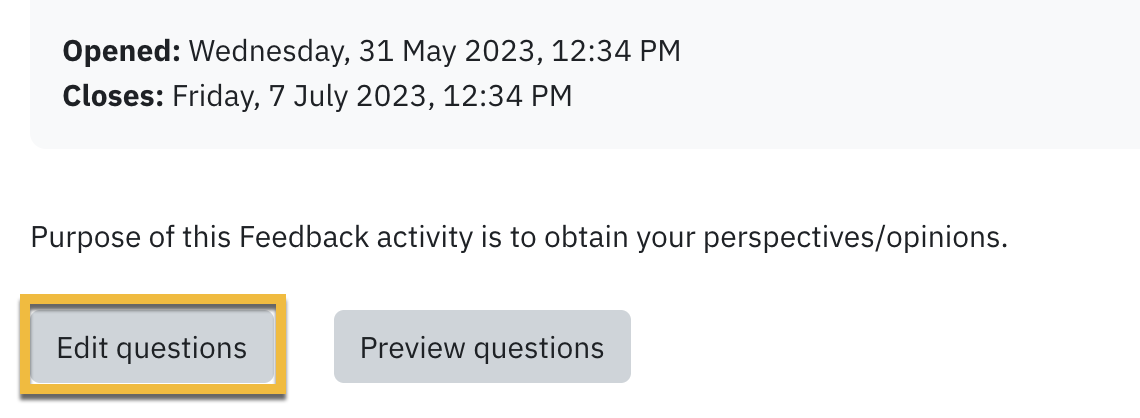
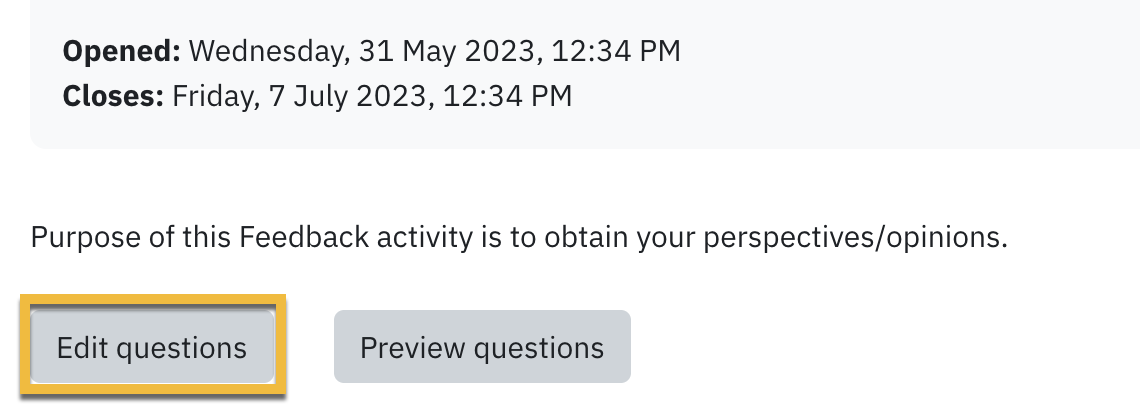
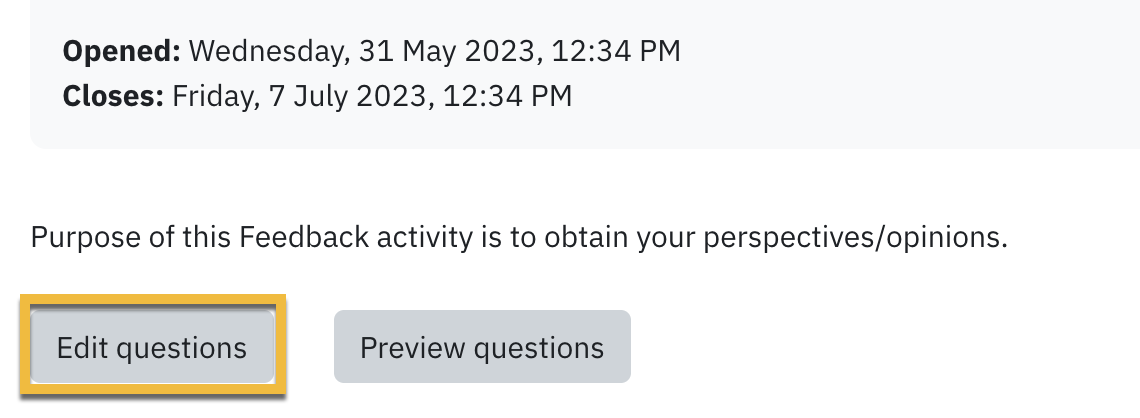
- Click the Feedback activity from the course homepage and click the Edit questions button.
- Select the type of question you wish to add from the Add question to activity drop-down menu and click the Add question button.
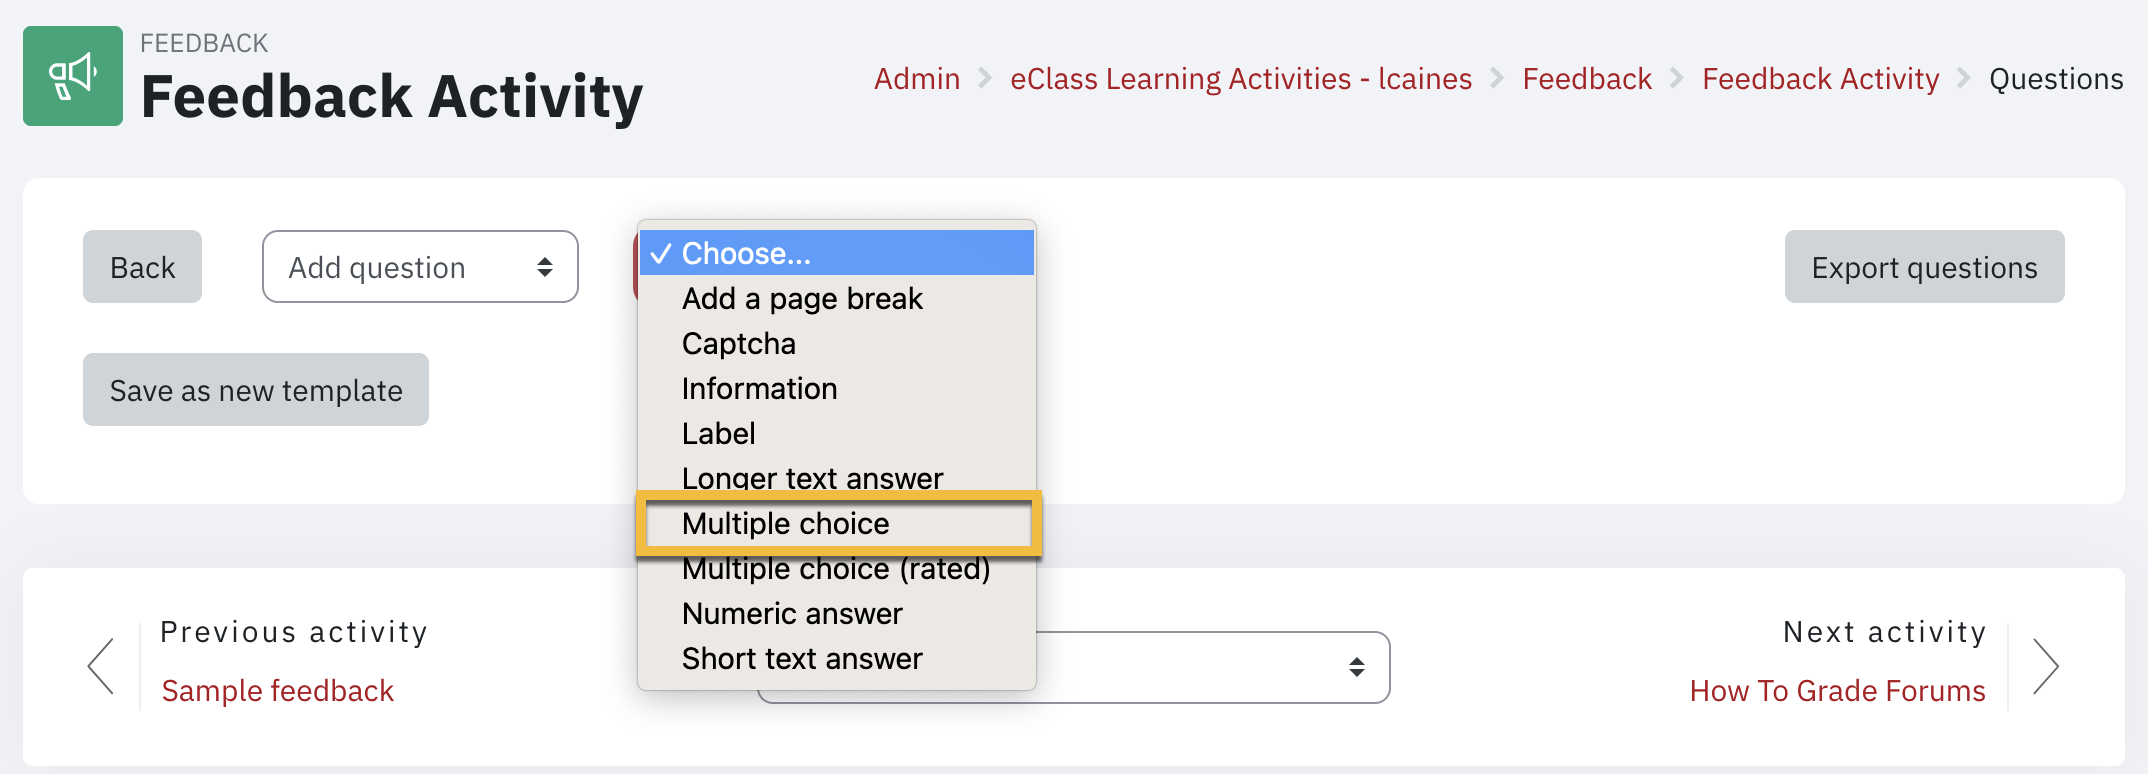
- The first four options relate to the formatting of the question.
- Add a page break: This option will put the following question on a new page.
- Captcha: This option inserts a question to make sure a real person is filling in the form and not an automatic spamming program of some sort. The student will be asked to type some distorted text displayed on in a box screen.
- Information: This option provides information to the teacher only about the survey. You can choose to display one of three types of information: the time of responding, the course or the category where the feedback is located. The information will be generated automatically, and the students will not see any information related to this item.
- Label: This option inserts a standard Moodle label, which allows you to add arbitrary text between questions allowing for extra explanation or to divide the Feedback into sections.
- Add a page break: This option will put the following question on a new page.
Multiple Choice question
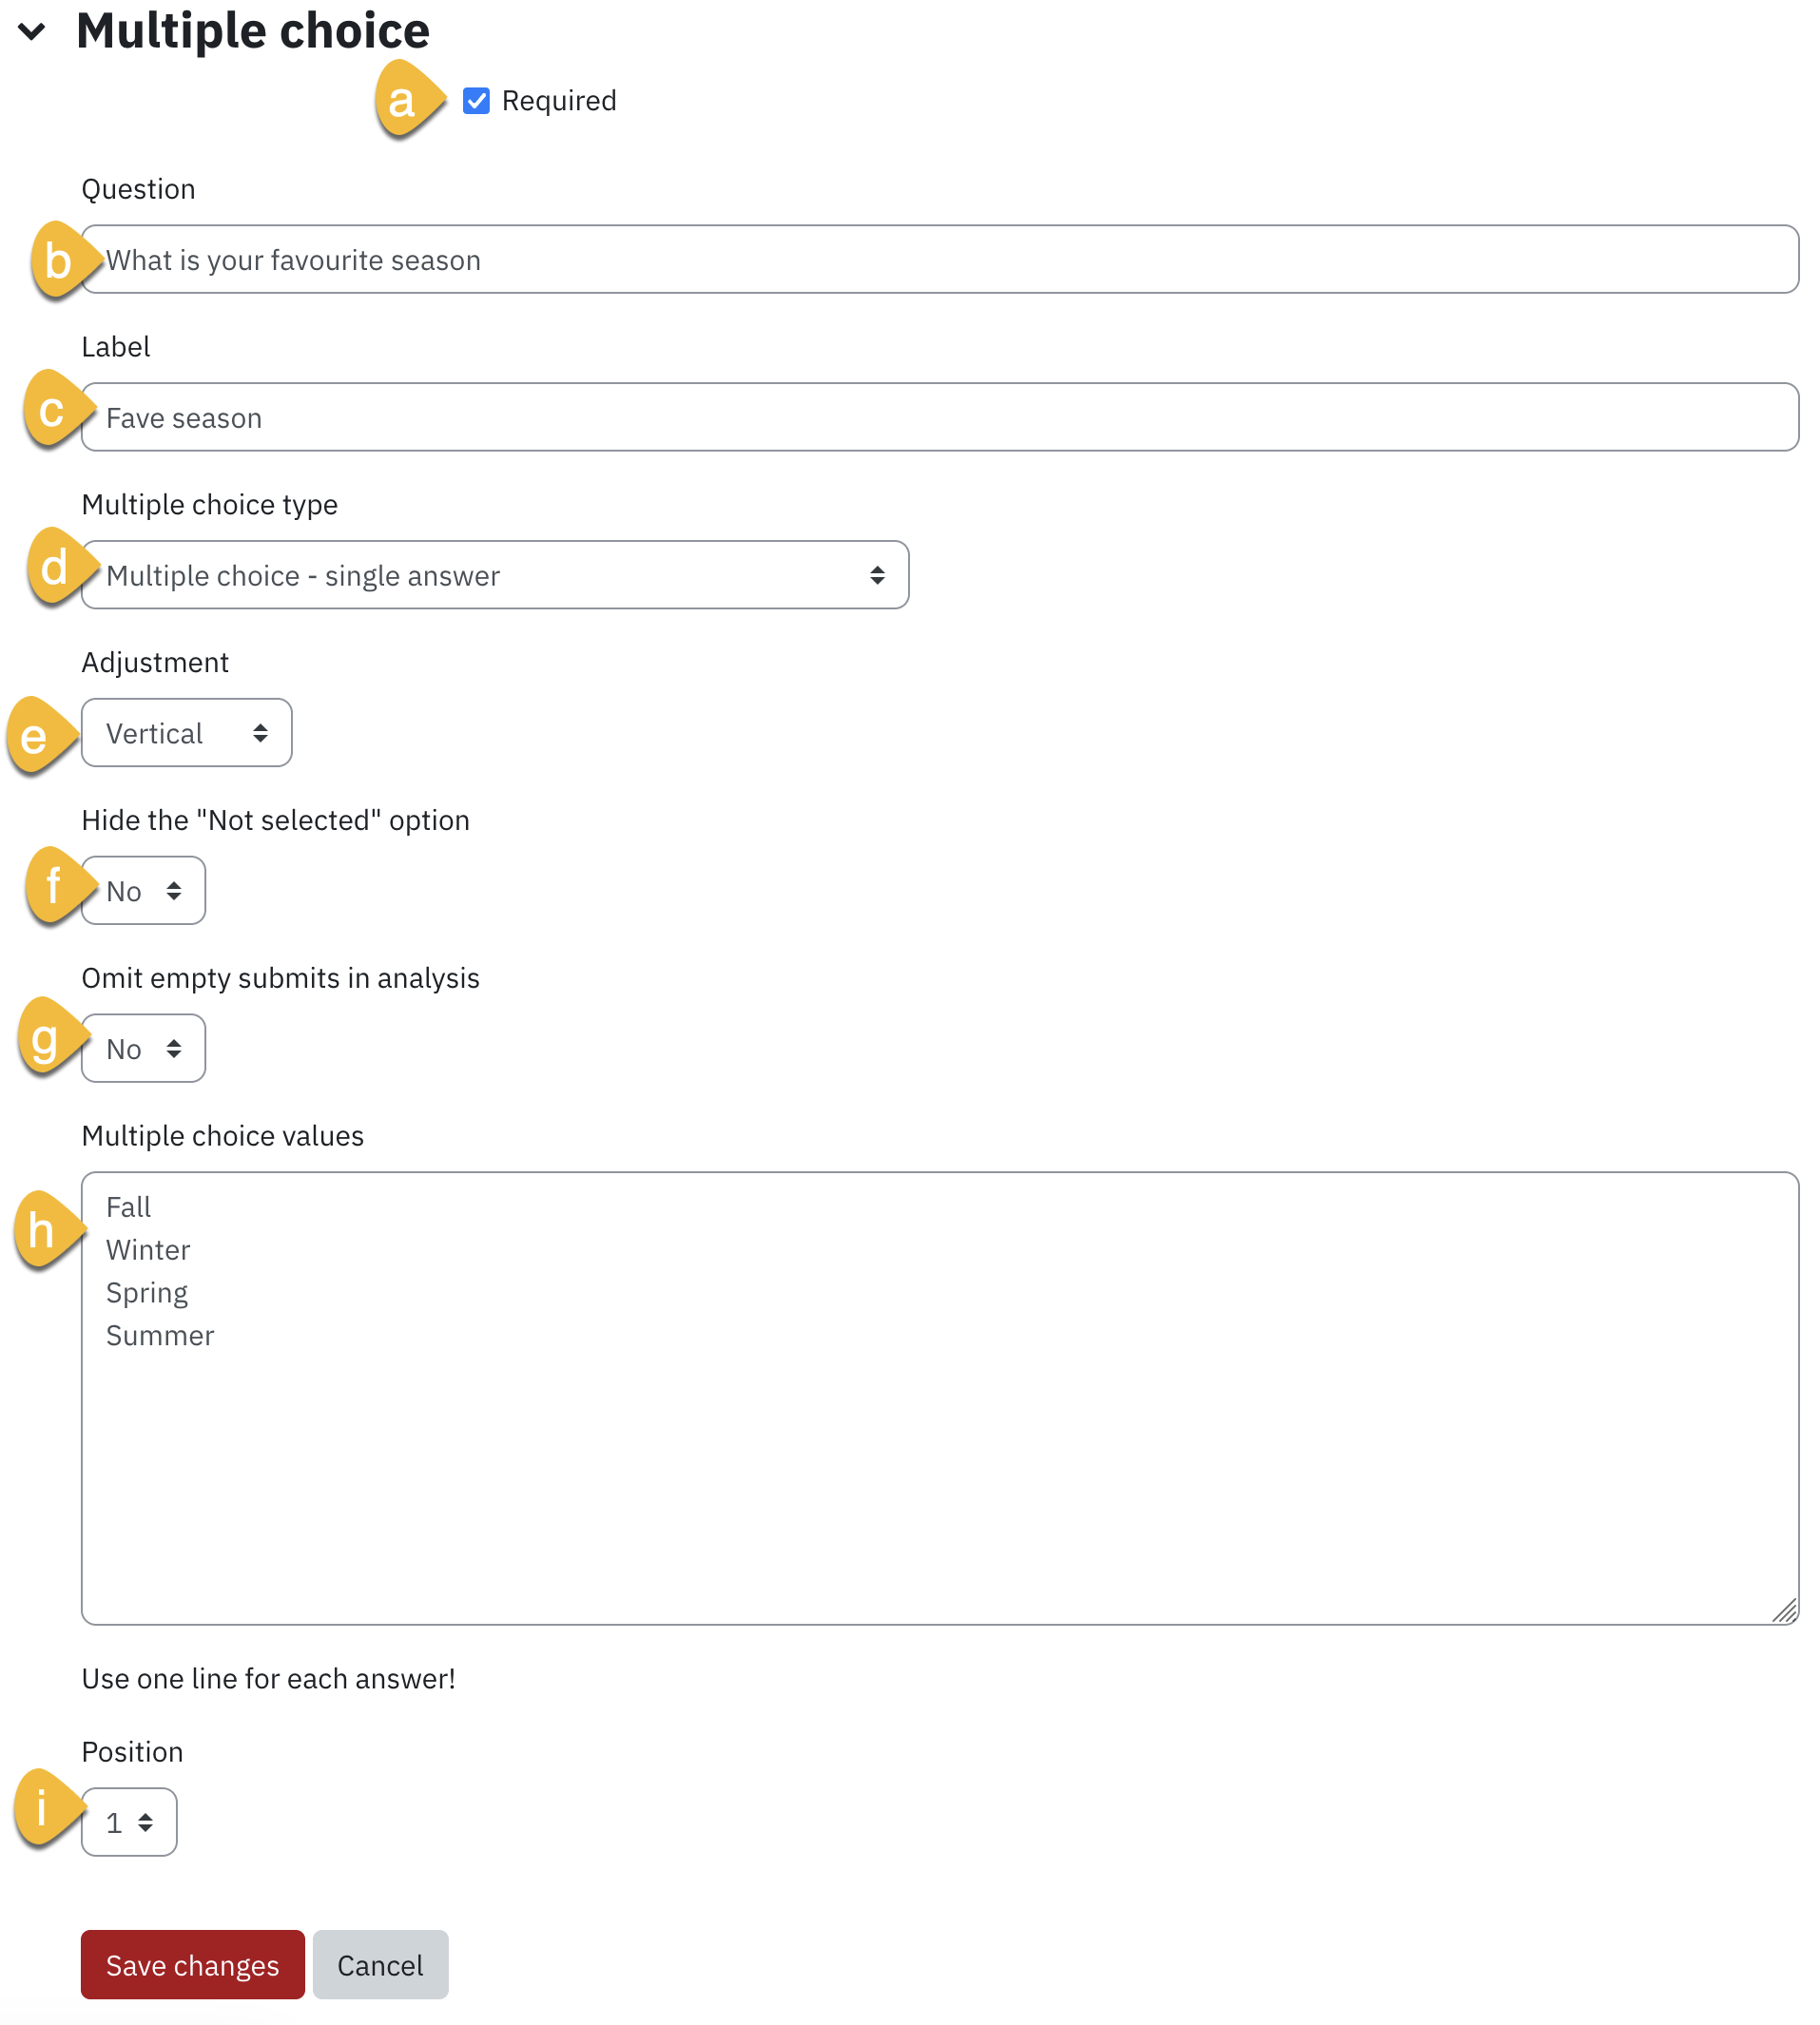
- Enter or select the appropriate question setting in the question settings’ page. The following illustration relates to multiple choice type questions but similar options are available for the other types.
a) Place a check-mark next to the Required checkbox if you want to make the answer mandatory.
b)Enter the question text in the Question field.
c) Enter a label for the question. This label is only for the instructor to make it easier to identify questions and use to select dependencies (below). Students do not see labels for questions.
d) For Multiple choice type field, click on the drop-down menu to select (single answer, multiple answers, or single answer allowed-drop-down menu).
e) In the Adjustment menu, select whether the answer values should be displayed vertically or horizontally.In the Adjustment menu, select whether the answer values should be displayed vertically or horizontally.
f) In the Hide the ‘Not selected’ option field, select if you want ‘not selected’ to be a choice for the students.
g) In the Omit empty submits in analysis field, select if you want optional questions that were not answered to be added to the results analysis.
h) In the Multiple choice values field: Use one line for each answer, enter the answer choices. Start a new line for each answer choice.
i) Position controls the order of the questions. Position 1 is the question nearest the top of the page, so when you create or edit a question, you can choose from the drop-down of available positions (which will vary depending on how many other questions there are). You can also rearrange questions by clicking the position up and down arrows on the main add questions screen.
2. Click Save question to add the question to the activity.
3. Click the Edit Questions page displays with a preview of existing questions and provides the option of adding more. Using the Edit button to the right of each question, you can edit, move and delete each on the drop-down menu.
Numeric answer question
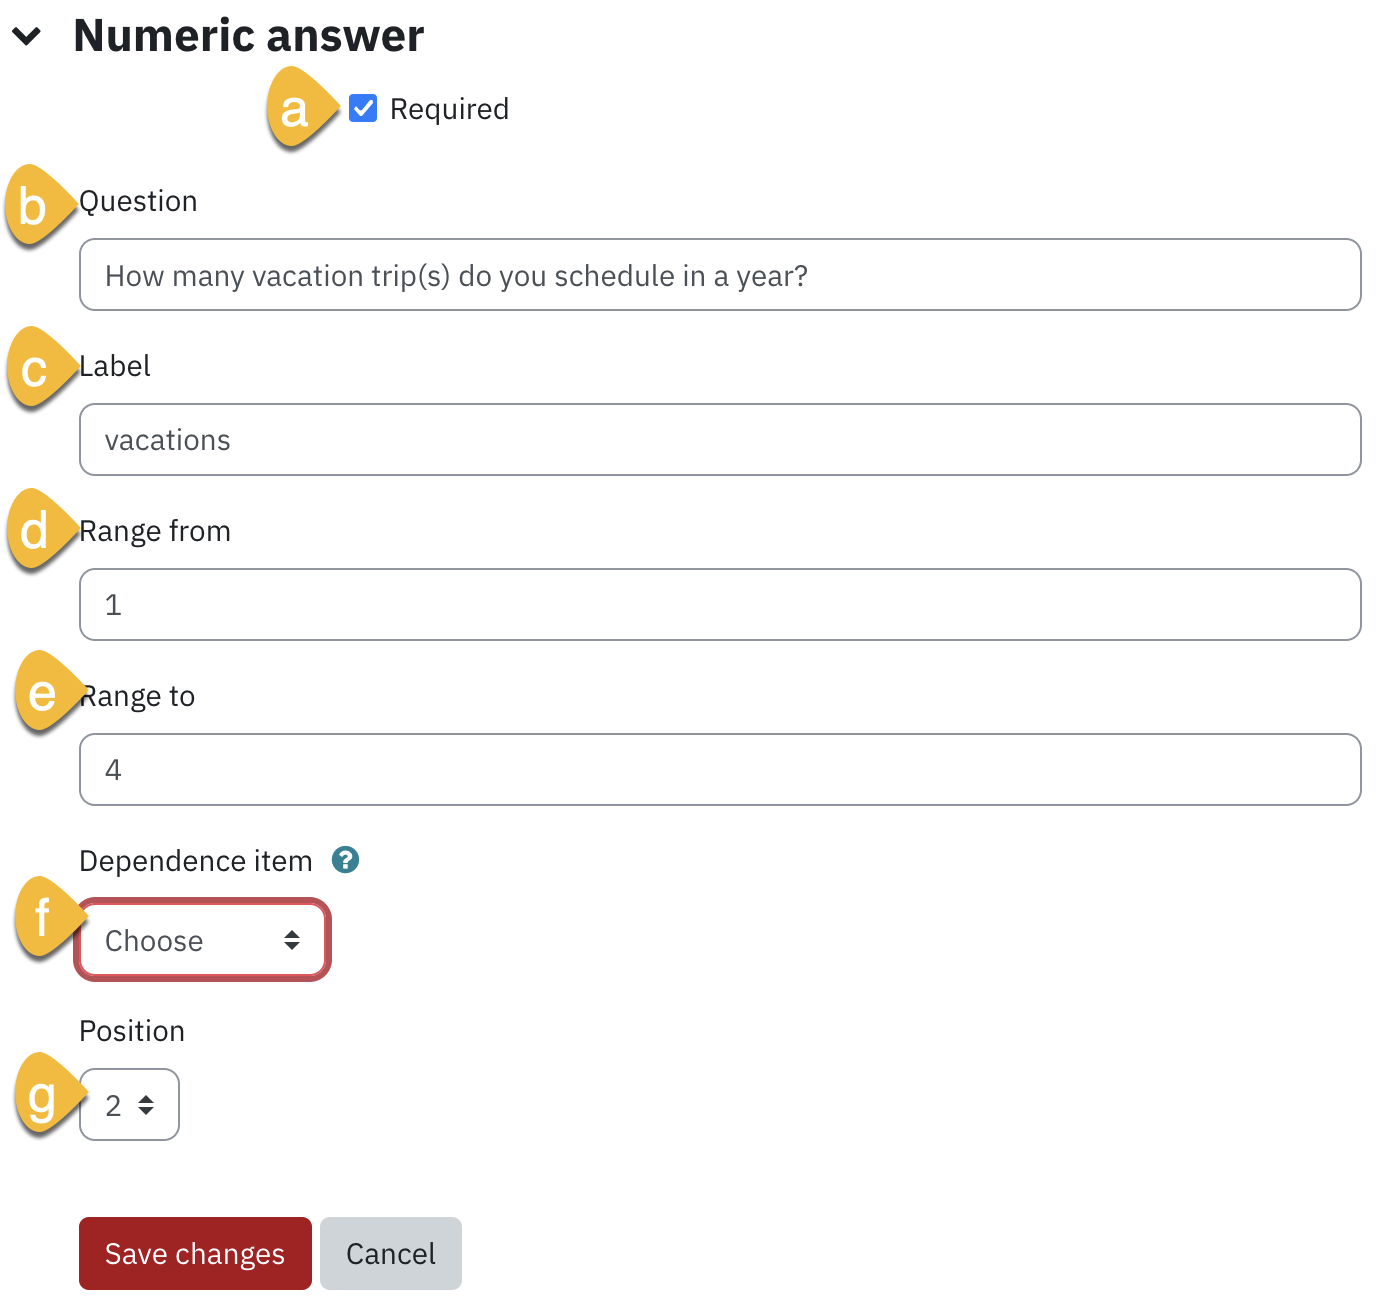
- Enter or select the appropriate question setting in the question settings’ page. The following illustration relates to numeric answer questions but similar options are available for the other types.
a) Place a check-mark next to the Required checkbox if you want to make the answer mandatory.
b) Enter the question text in the Question field.
c) Enter a label for the question. This label is only for the instructor to make it easier to identify questions and use to select dependencies (below). Students do not see labels for questions.
d) For Range from select the minimum option
e) For Range to select the maximum option
f) For the Dependence item, select the label of the question upon which the current question is dependent upon. Dependencies are optional and can only be based upon questions that are asked before the question that is currently being added, and they must be separated by a page break.
g) Position controls the order of the questions. Position 1 is the question nearest the top of the page, so when you create or edit a question, you can choose from the drop-down of available positions (which will vary depending on how many other questions there are). You can also rearrange questions by clicking the position up and down arrows on the main add questions screen.
2. Click Save question to add the question to the activity.
3. Click the Edit Questions page displays with a preview of existing questions and provides the option of adding more. Using the Edit button to the right of each question, you can edit, move and delete each on the drop-down menu.
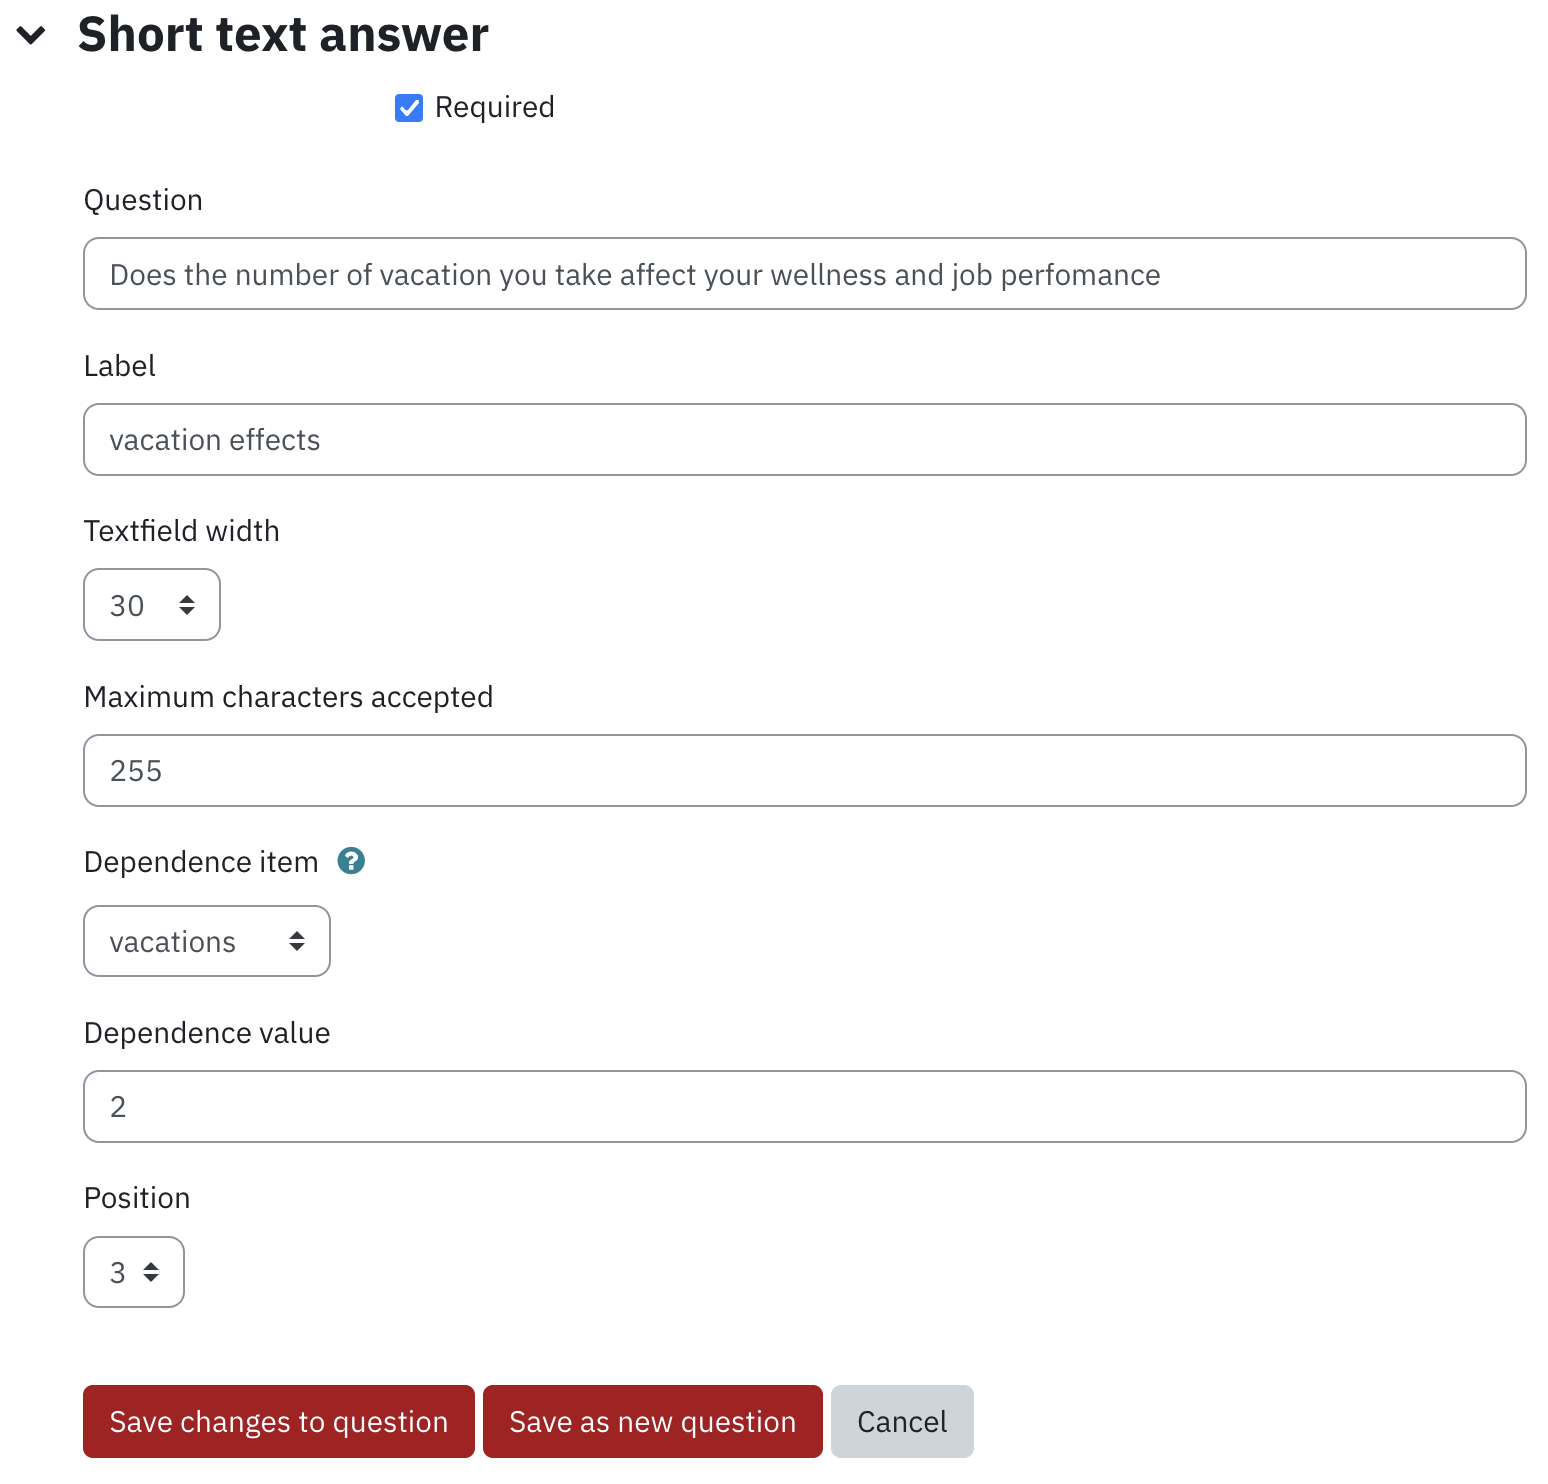
Short text answer question
- Enter or select the appropriate question setting in the question settings’ page. The following illustration relates to short text answer questions but similar options are available for the other types.
a) Place a check-mark next to the Required checkbox if you want to make the answer mandatory.
b) Enter the question text in the Question field.
c) Enter a label for the question. This label is only for the instructor to make it easier to identify questions and use to select dependencies (below). Students do not see labels for questions.
d) For Textfield width field, choose your preference from the drop-down menu.
e) For Maximum characters accepted field, enter your preferred number.
f) For the Dependence item, select the label of the question upon which the current question is dependent upon. Dependencies are optional and can only be based upon questions that are asked before the question that is currently being added, and they must be separated by a page break.
g) For the Dependency Value field, the value must match exactly for the question to be displayed to students.
h) Position controls the order of the questions. Position 1 is the question nearest the top of the page, so when you create or edit a question, you can choose from the drop-down of available positions (which will vary depending on how many other questions there are). You can also rearrange questions by clicking the position up and down arrows on the main add questions screen.
2. Click Save question to add the question to the activity.
3. Click the Edit Questions page displays with a preview of existing questions and provides the option of adding more. Using the Edit button to the right of each question, you can edit, move and delete each on the drop-down menu.
Repeat steps 1-3 to add additional questions to the Feedback activity.
You can save sets of questions as Templates to make them available for other Feedback activities within the same course or other courses.
Analyzing and Exporting Feedback Results
- Click the title of the Feedback activity from the course home page.
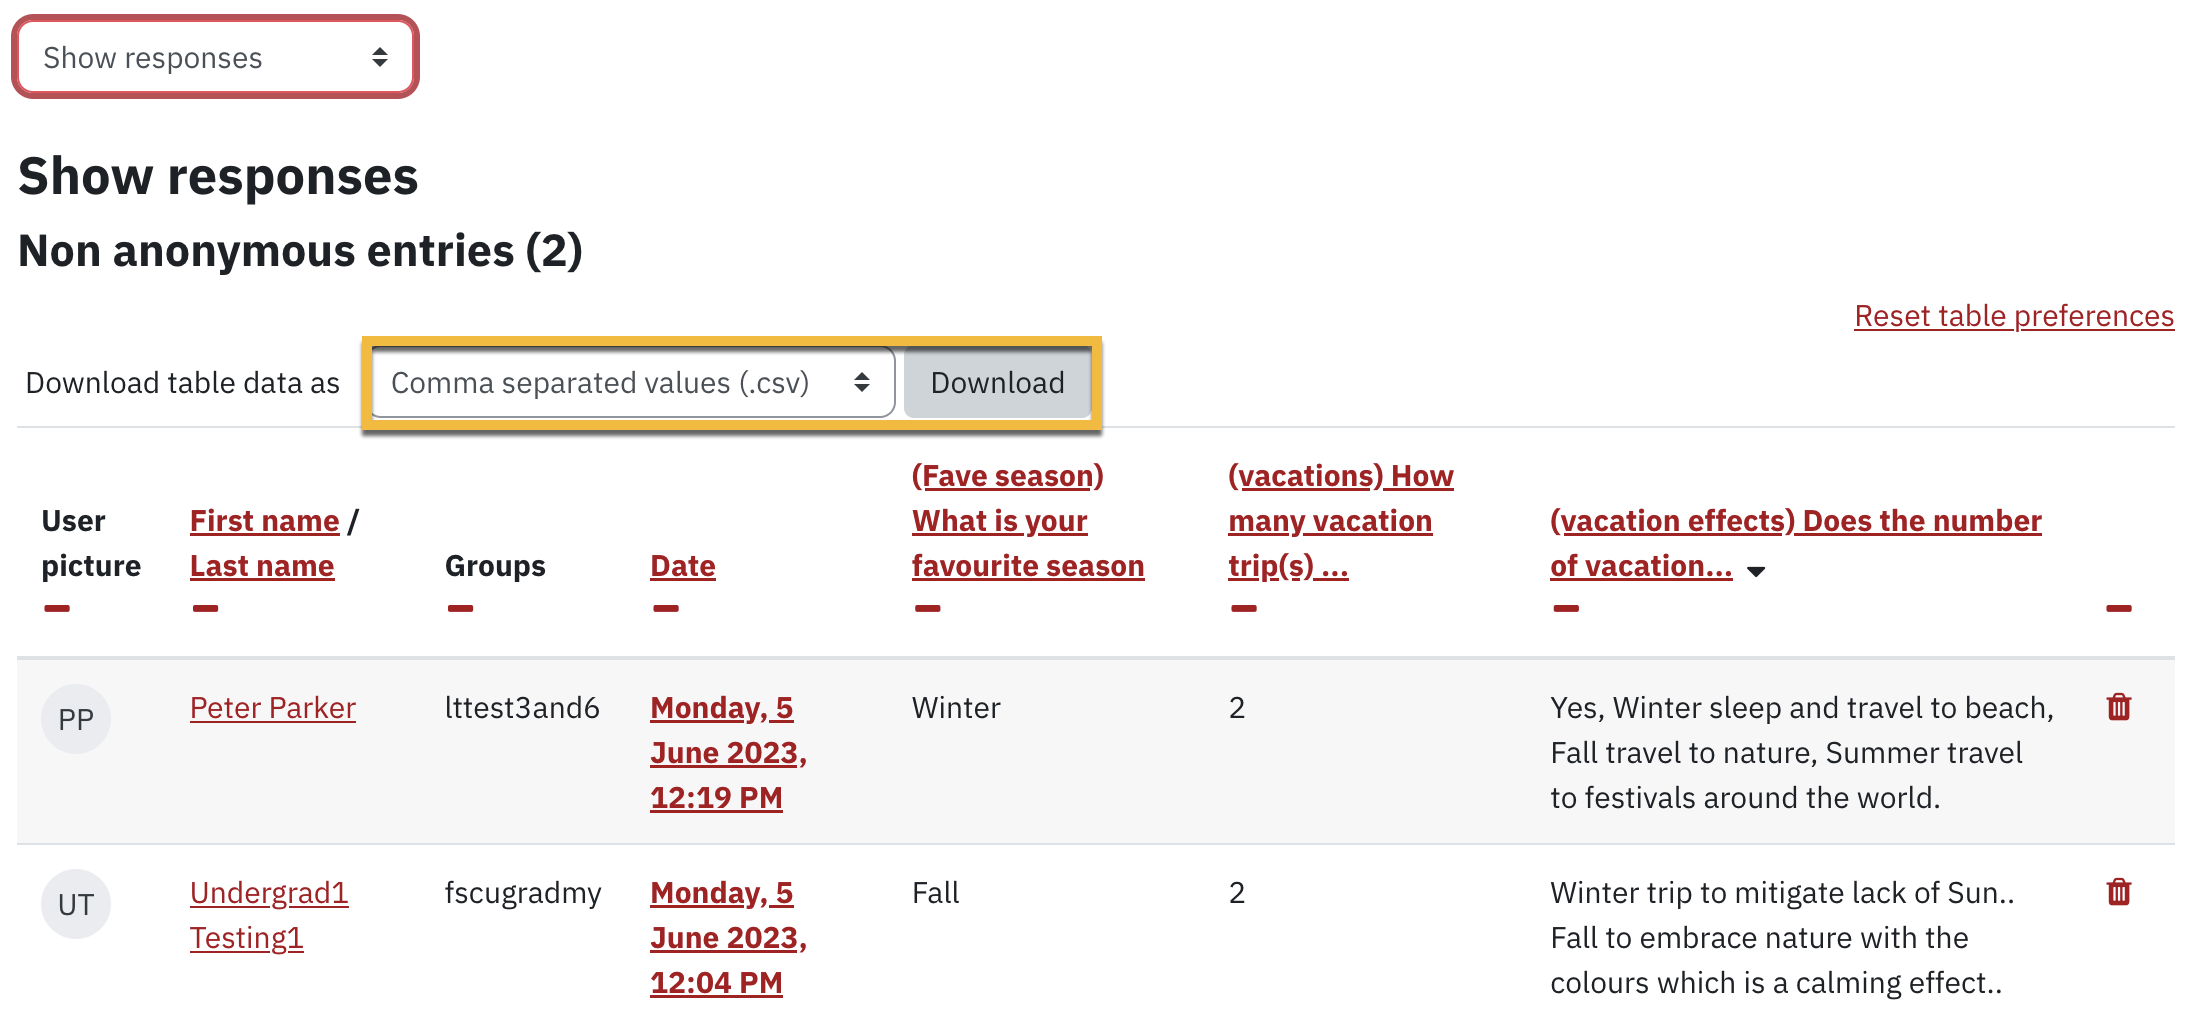
- Click on more in the top row, and select Responses from the drop-down menu. Individual responses are displayed if you have enabled the option of seeing each participant’s name in the evaluation.

3. From the response page, you have the option to Download the file to MS-Excel to generate more reports.
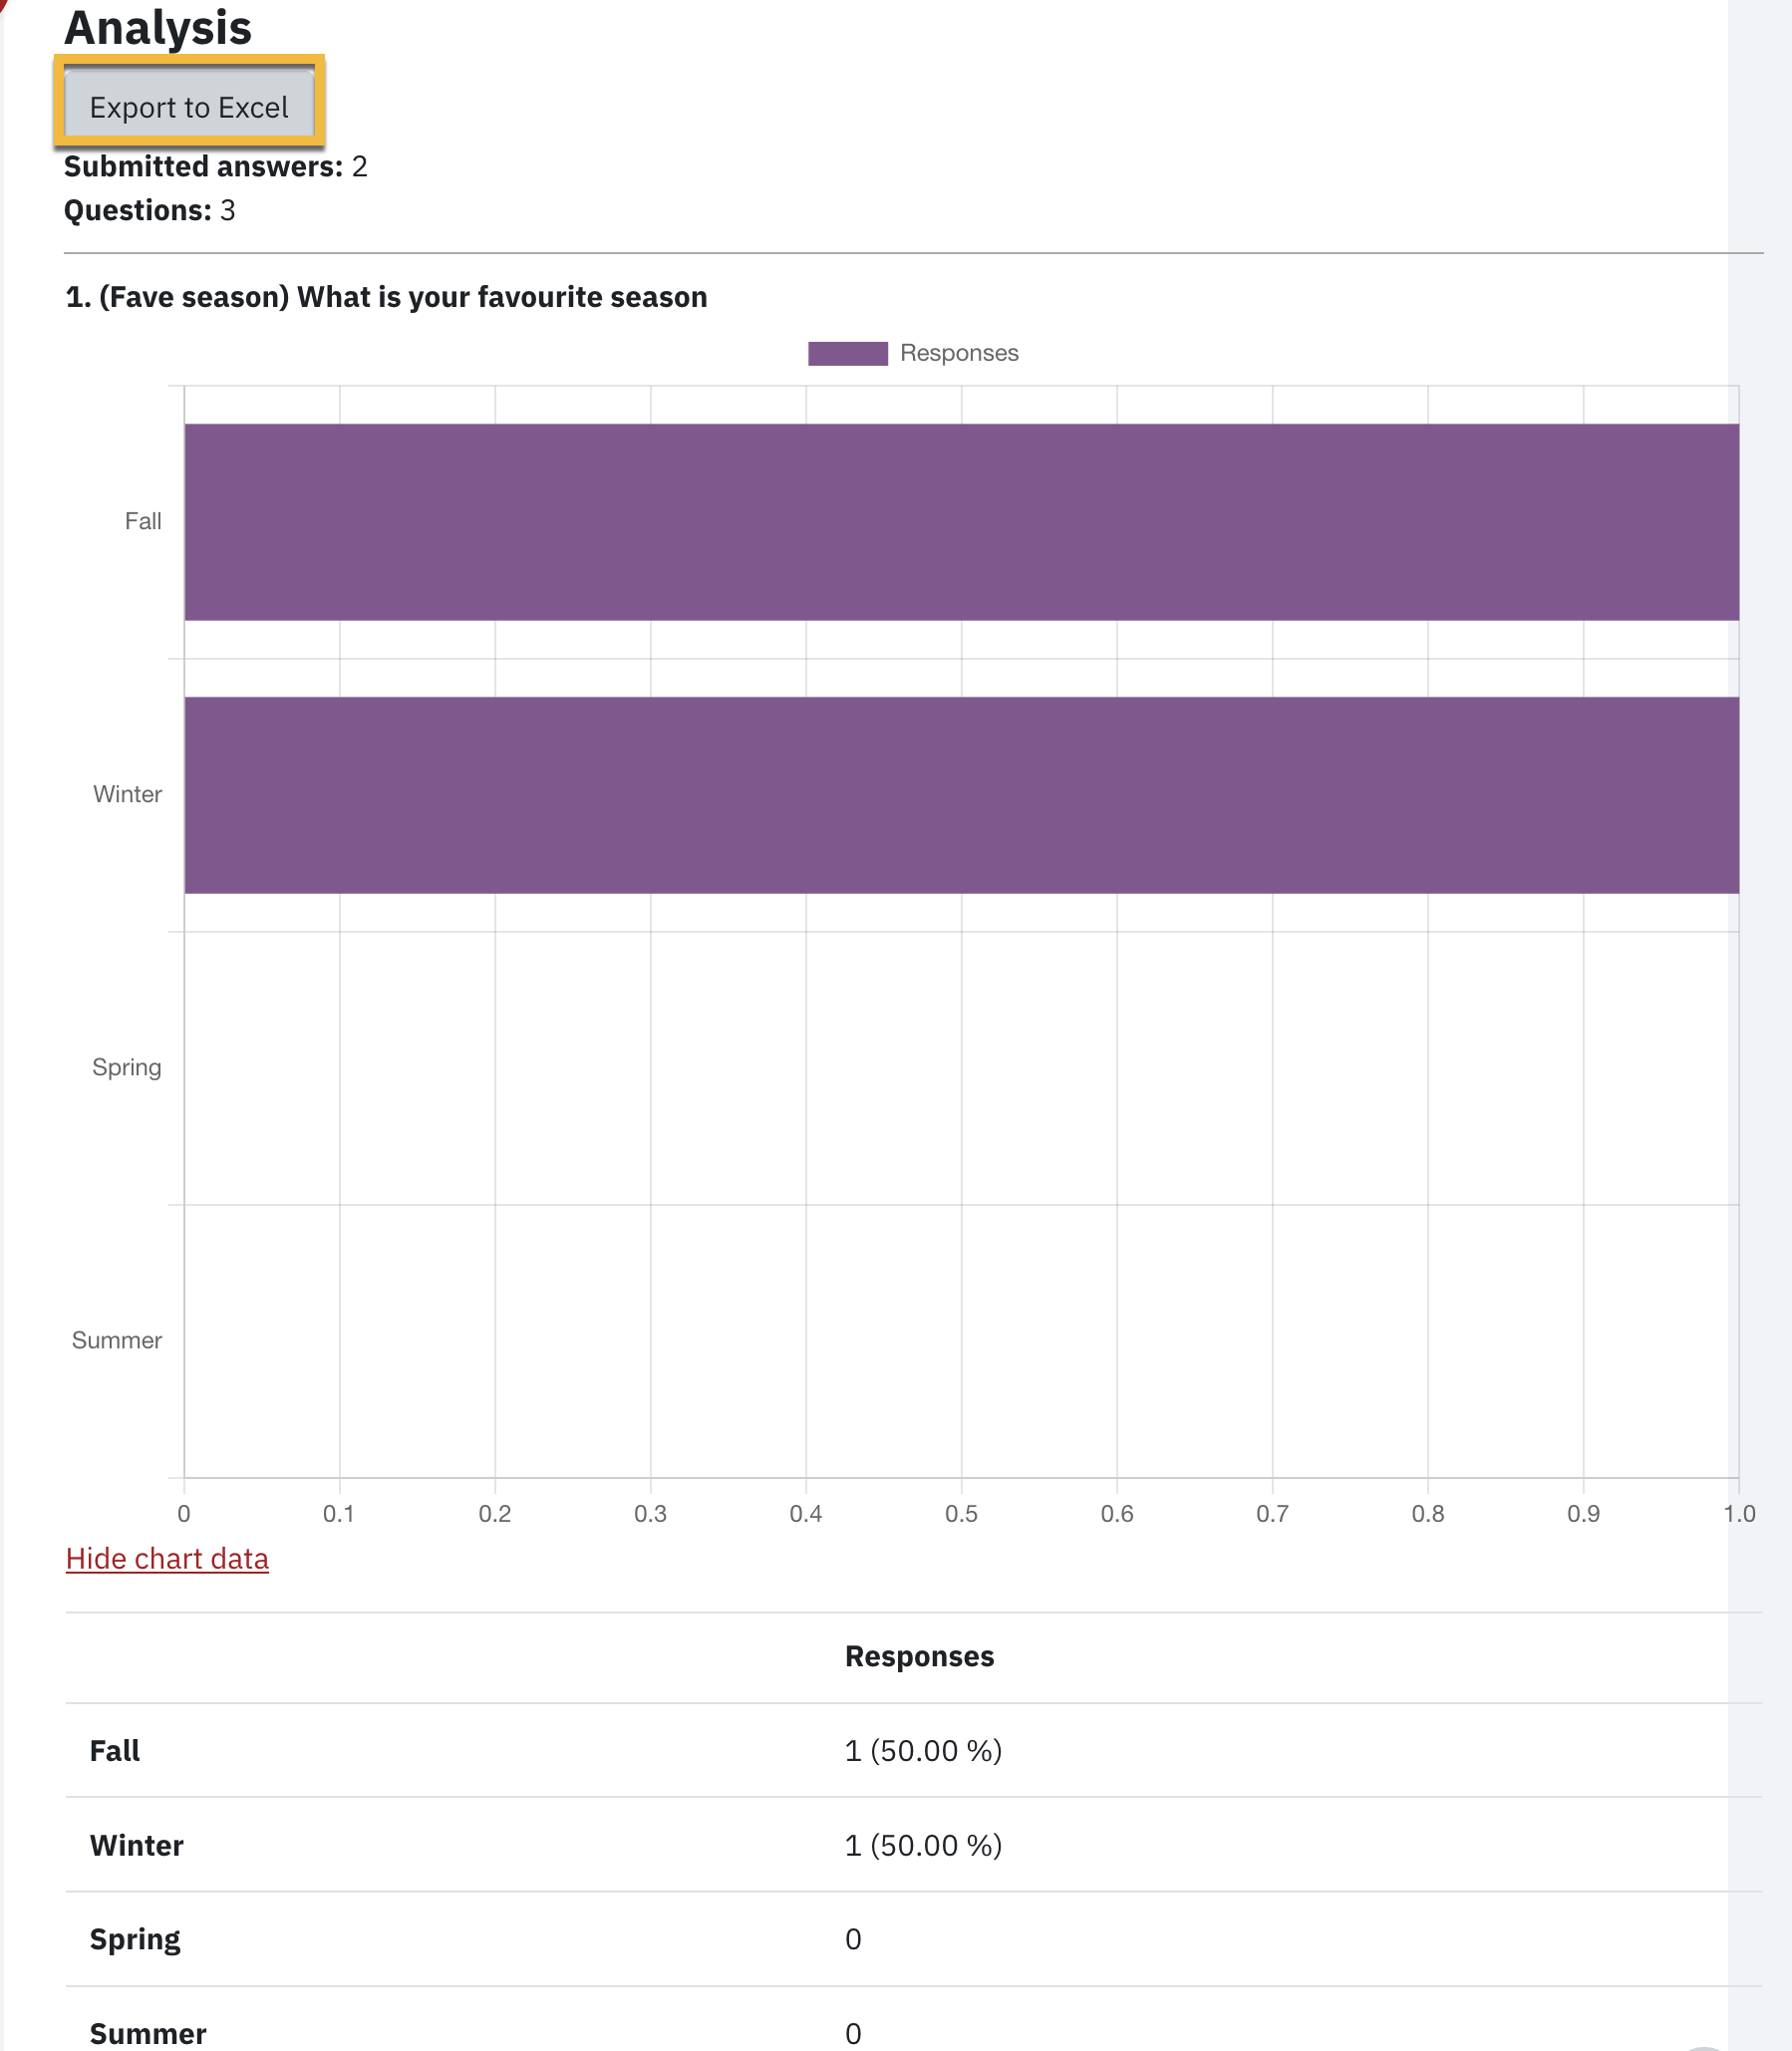
4. From the response page, click on more in the top row and select Analysis to view the aggregated data of each evaluation choice.

5. From the name Analysis page, you can also Export to Excel.
iClicker FAQs
No need to create another iClicker account with another email address. You can change your email address in your iClicker account and participate in your course polling.
It is recommended that you use the same email address that you use in eClass to ensure that your polling results are synched both in iClicker and your eClass course.
Below are the instructions to change your email address:
- Go to iClicker Student - Login
- Login with your email address
- Click on the blue hamburger icon in the upper left corner
- Select Profile from the list
- Enter your eClass email address in the Email field
- Click Save profile
For your iClicker account, it is recommended that you register with the same email address that you use in eClass along with your York University student number.
This ensures that your polling scores are synched both in your iClicker course and your eClass course.
If you are having problems connecting to your iClicker course, here are a few housekeeping tips to help troubleshoot the problem:
- Check iClicker Cloud service status at https://iclicker.statuspage.io/
- Check eClass service status at https://yorkuniversity.statuspage.io/
- Check these maintenance steps for your mobile device or laptop
If your problem persist, complete the iClicker Contact Support form.
Lecture Recording FAQs
To use Panopto from your eClass course, you will have to:
- Add the Panopto block in your course
- Add a link to your recording folder using Panopto activity
Add the Panopto block to set up the link to your course (Required)
You must add the block to set up the link between eClass and Panopto. This will create a folder for your course in Panopto where your recordings will be added. Any Instructors in the course will get creator access in order to publish recordings to that course folder. Students will automatically get the rights to view the videos. The block will also provide students a quick way to access your course recordings.
Follow the steps below to add Panopto to your course:
1. Go to your course in eClass. While on your main course homepage, turn Edit mode on located in the upper right hand corner.

2. On the right side of the course click on the Open block drawer icon to expand.

3. Click Add a Block which is the first open when the block drawer is expanded.

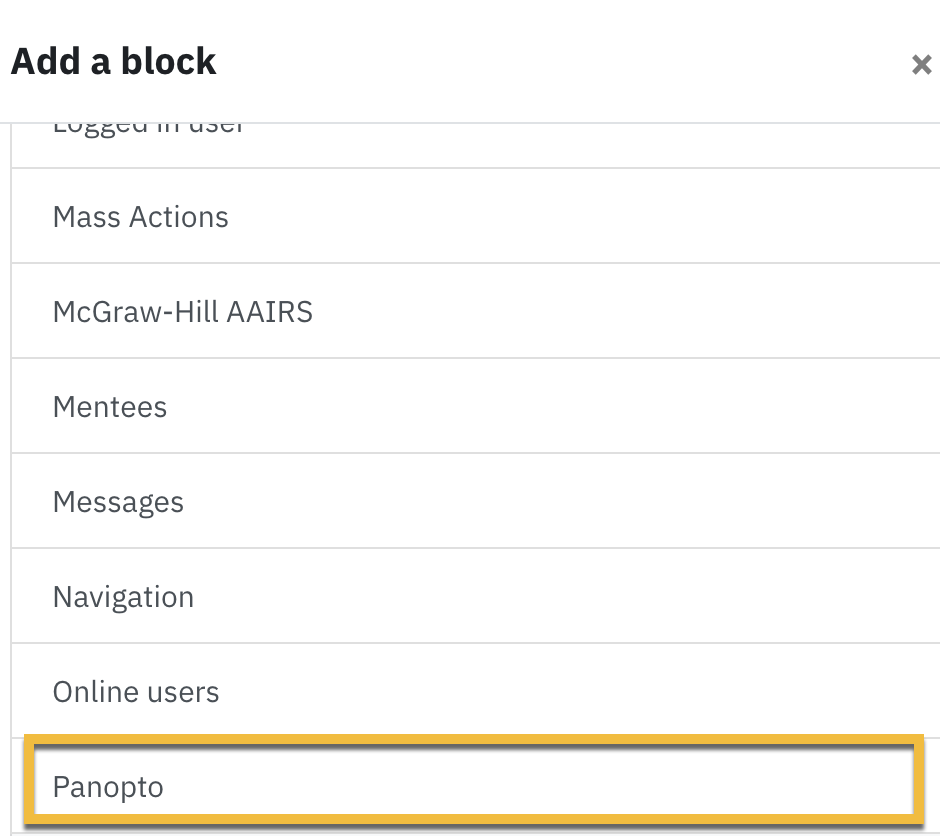
4. In the Add a Block pop up menu, scroll down and select Panopto
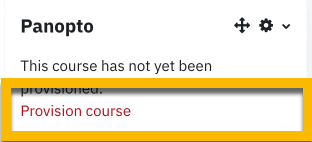
5. Within the Panopto block click Provision course. You will receive messaging about the successful attempt. Click on the red link labelled Back to course list.
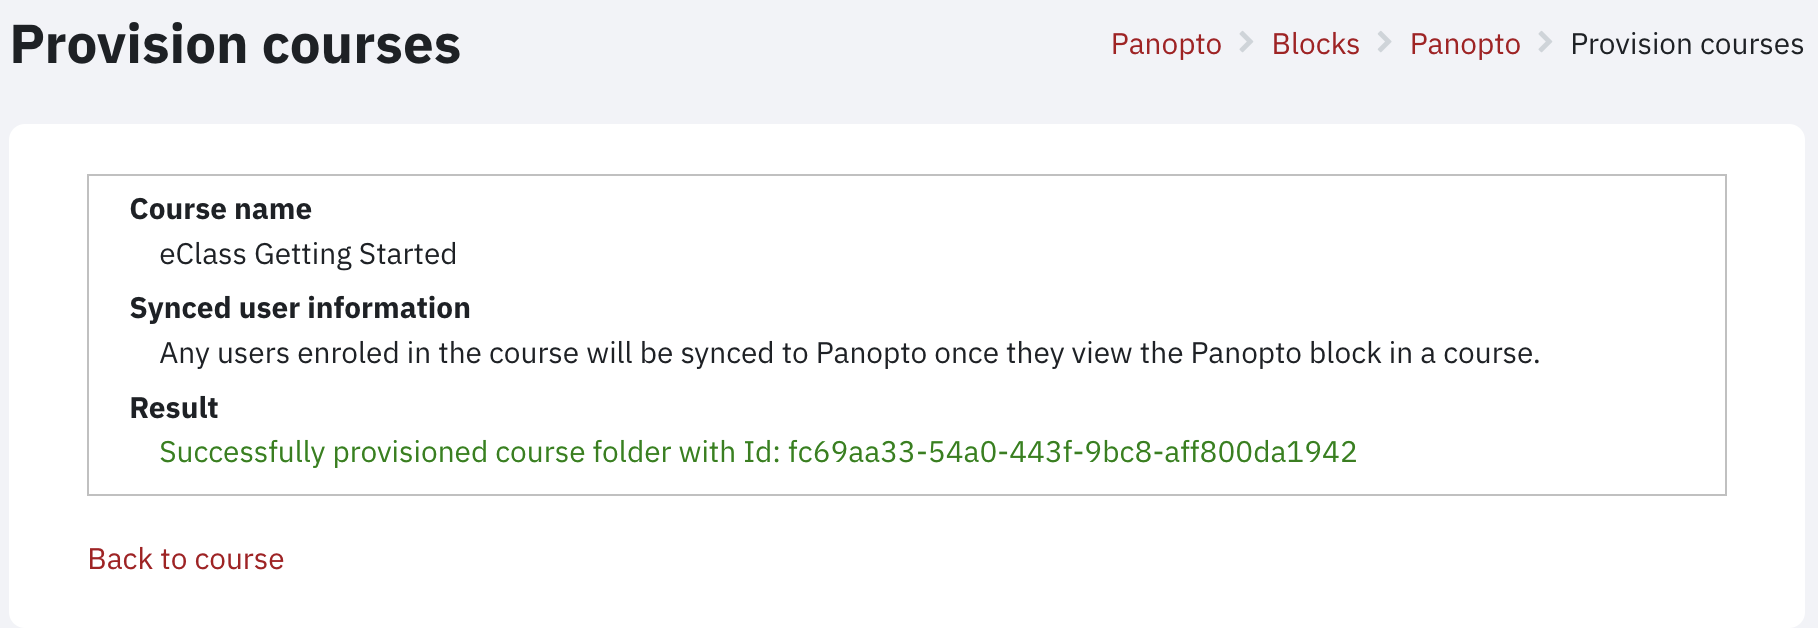
6. A new window will appear with a successful message confirming that the course has been provisioned. Click on the link Back to course
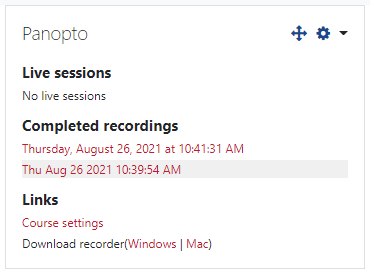
7. If the course was already provisioned, or if you re-added the block to the course, your Panopto block will have links to live sessions, completed recordings and links to Windows/Mac recorders.
Add a link to your full recording folder (Recommended)
In addition to adding a block to your eClass you can also add a link to an embedded view of your folder. This will allow students to navigate easily to other recordings for this course.
1. Go to your course in eClass. While on your main course homepage, turn Edit mode on located in the upper right hand corner.

2. Click Add an activity or resource in the section where you would like to add the link to the Panopto folder.

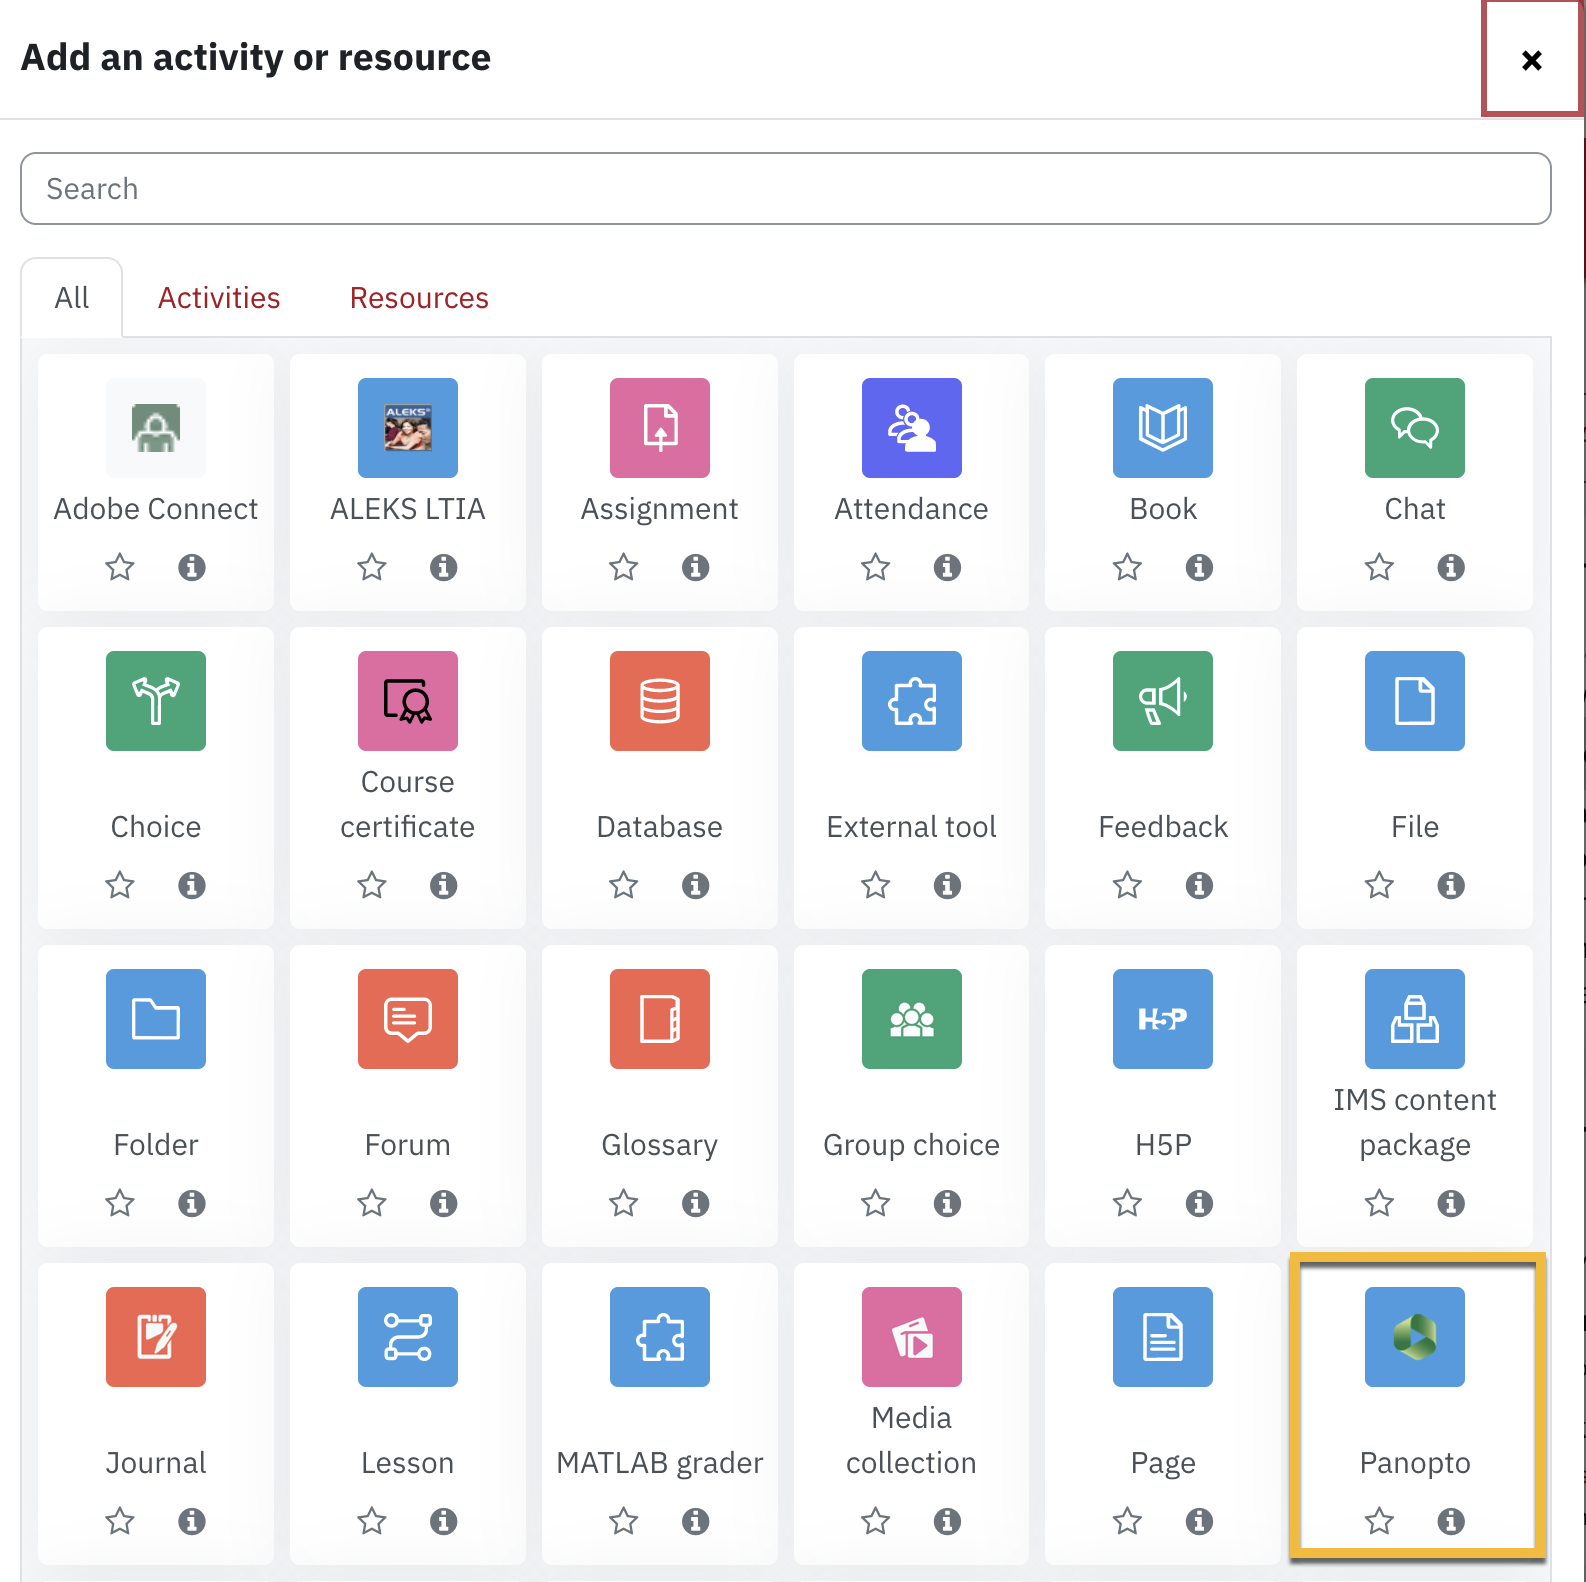
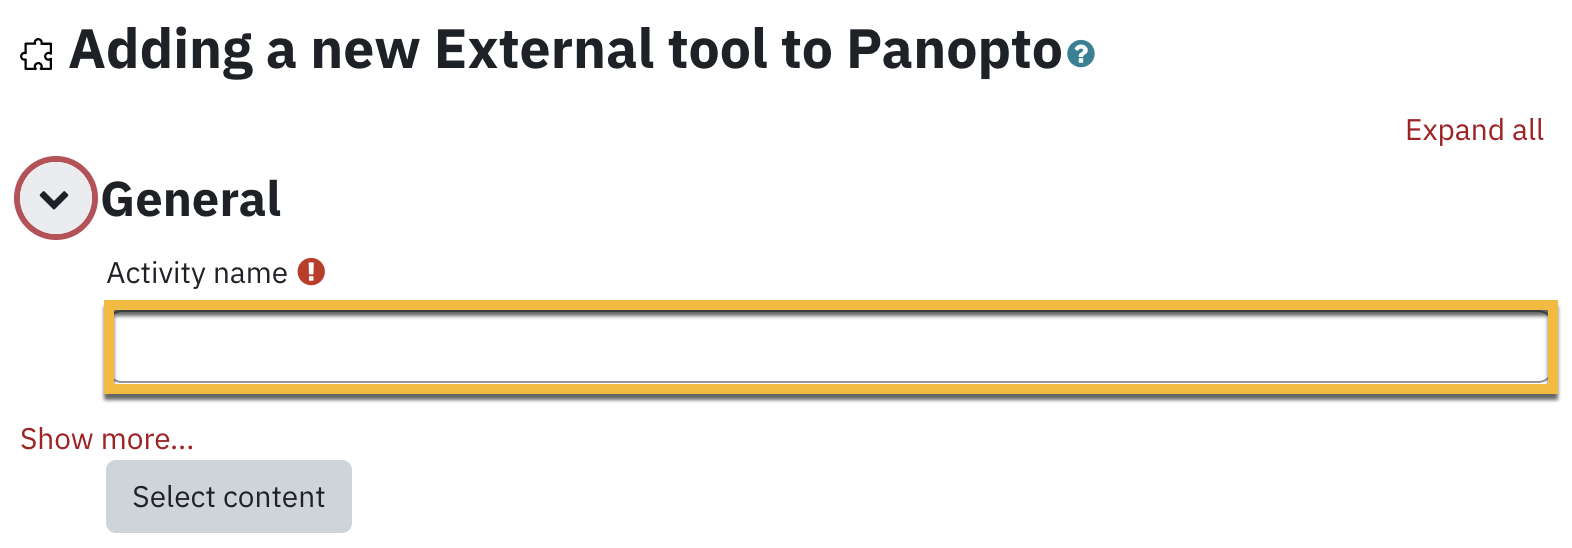
3. Select Panopto in the pop-up (also listed under Activities tab), or you can type Panopto in the Search field and then click Add. The Adding a new External tool page will appear.
4. Give an Activity name. This will appear as a link to the Panopto folder on the course homepage.
5. Click Save and return to the course to return to the course page.
Turnitin FAQs
- Select the Add Class button to start creating a class to visit the Create a new class page.
- Enter a class name and an enrollment key. Your students can use the enrollment key to join your class.
- The class end date is the date that your class expires.
- Select the Submit button to add the class to your instructor homepage.
NOTE: When a class expires, students can no longer submit papers or enroll in the class. The default duration for all classes is 6 months. If you want your class to last longer, you can change the end date at any time.
The class will now appear in your class list on the instructor homepage. The number to the left of your class name is the class ID. Students will use this ID, along with the class enrollment key, to enroll in your class.
You can view your class enrollment key at any time by clicking the gear-shaped edit icon to the right of your class.
You should distribute your class ID and enrollment key to your students so that they can enroll in your class and submit their papers. Be sure to include this link to our Student quick start guide.
IMPORTANT: Don't share your enrollment key publicly outside of your institution. With a Class ID and key anyone, at any institution, will be able to join your class.
- Within your class homepage click on the Add Assignment button to create an assignment.
- Enter an assignment title and choose a start and due date for the assignment.
- The default assignment submission option is to Allow only file types that Turnitin can check for similarity. However, for non-writing assignments, instructors can select Allow any file type.
If Allow any file type is selected, instructors can leave feedback on and download submitted files, but Turnitin may not be able to generate similarity reports or display the uploaded file within the Turnitin Viewer.
Similarity Reports can be generated for the following file types:Microsoft Word
PowerPoint
WordPerfect
PostScript
HTML
RTF
OpenOffice (ODT)
Hangul (HWP)
Google Docs, Google Slides, Google Sheets (submitted via the Google Drive submission option),
Plain text files
Students will be able to submit their papers to the assignment starting on the start date and until the due date passes.
4.Select the Submit button to add the assignment to your class homepage.
Yes.
- If you'd like to submit papers on behalf of your students, select View alongside the paper assignment name to open the assignment inbox.
- Select the Submit Paper button.
- On the paper submission page, enter the paper's title and select the author's name from the author drop-down menu of enrolled students.
- You can upload a file from your computer, Dropbox, or Google Drive.
- When you are done, select the Upload button to upload the paper.
From the Assignment Inbox, select on the blue pencil icon next to the paper title to open the paper with our online grading tools to grade the student submission online. Turnitin Feedback Studio contains several tools and types of marks that instructors can use in grading and assessing papers.
These include the following:
- Comments
- Inline comments
- QuickMark comments
- Rubric scorecards
- Summary comments
- Voice comments

Learn More
Not finding what you are looking for or need technical assistance? We are here to support you!
