Skip to main content Skip to local navigation
Home » Faculty & Staff Services » Off-Campus Computing

Off-Campus Computing

The off-campus computing page will provides everything you need to work remotely.

**Please note that before you leave your work computer behind, you must record its name. Each computer has a unique name, and you won’t be able to remotely access yours without knowing it. Find your computer’s name.

To learn how you can keep everything you’re doing at home cyber-secure, visit Cybersecurity Best Practices for Working Remotely

Featured Services

Overview:

Remote Desktop Protocol (RDP) allows you to use your home computer to access your work computer.

How do I access it?

Before you begin:

  1. You will need to restart your work computer
  2. Log in to your work computer, and record your work computer’s name (PDF)
  3. Log out of your work computer but leave it powered on
  4. Make sure you connect your home computer to York’s VPN service

RDP Instructions

Overview:

You can access the files on your York share drives from home.

How do I access it?

Before leaving your work computer behind, we recommend copying all your personal folders and files into OneDrive. OneDrive is the easiest way to access and update your documents remotely.

There are two additional ways to access shared drives remotely:

1. Connect to York’s Virtual Private Network (VPN)

2. Open File Explorer

Screenshot of File explorer icon

3. Once the File Explorer opens, right-click on This PC 

4. Now, select Map Network Drive

  • If you don’t see this option in your File Explorer

a. On the top ribbon menu, select View

b. Click Preview Pane 

Screenshot of clicking View and Map network drive

5. When prompted, In the Folder section, type the address: \\vfadmin.yorku.yorku.ca

  • Attention research faculties. Some research faculties may need to enter a different address to access their academic server: smb://vfacad.yorku.yorku.ca

6. Select the Reconnect at sign-in checkbox

7. Check Connect using different credentials

8. Now, click Browse

Screenshot of entering drive address
  • If prompted, enter your Passport York username followed by @yorku.ca and py password

9. On the “Browse for Folder” screen, click the arrow beside the “vfadmin.yorku.yorku.ca” field to expand the folder options

Screenshot of browsing to shared folder

10. You will now be presented with a list of departmental shares. Select your home department’s share to expand it

  • You will receive an error message if you have selected a share that you do not have permission to access

11. Click the Home folder to expand it

12. Now, select the folder with your Passport York username

13. Click OK

Screenshot of browsing to specific folder with username

14. You’ll be brought back to the “Map Network Drive” screen, this time click Finish

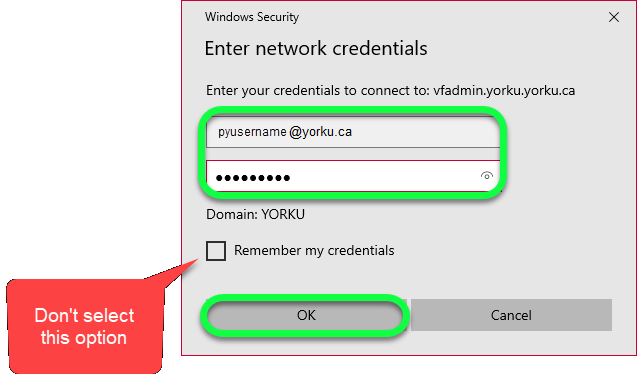
15. Enter your Passport York username followed by @yorku.ca and password to log in

  • Ensure you don’t check the Remember my credentials option. If you check this option, you will be required to remove this password every time you reset your Passport York password.
Screenshot of enter network credentials popup asking to enter ppy username and password

1. Connect to York’s Virtual Private Network (VPN)

2. Open Finder

3. Click Go

4. Select Connect to Server

Screenshot of clicking on Go and Connect to Server

5. On the “Connect to Server” window, enter smb://vfadmin.yorku.yorku.ca/ in the Server Address field and click Connect

  • Attention research faculties. Some research faculties may need to enter a different address to access their academic server: smb://vfacad.yorku.yorku.ca
Screenshot of connecting to a server on a mac

6. When prompted, click Connect

Screenshot of attempting to connect to a server

7. Enter your Passport York username and password to log in

  • Ensure you don’t check the Remember this password in my keychain option. If you check this option, you will be required to remove this cached credential from your keychain when you reset your Passport York password.
Screenshot of popup asking username and password

8. You will now be presented with a list of departmental shares. Select your home department’s share and click OK

  • You will receive an error message if you have selected a share that you do not have permission to access
Screenshot of selecting UIT in the list of drives

9. When your departmental share opens, double click on the Home folder to open it

Screenshot of selecting folder called Home

10. Now, open the folder with your Passport York username 

Screenshot of folder with username

You will now see all the files on your home drive.

**Please note you won’t be able to open files directly in the MyApps file explorer like you can in OneDrive. If you want to work on a file remotely, you must copy the file from the MyApps file explorer to your computer. We recommend you copy it somewhere simple like My Documents or your Desktop. Once you are finished updating your document, make sure to save your work and copy the newly saved file back to your shared drive using the MyApps File Explorer.

1. Go to the MyApps portal

2. Sign in using your Passport York username and password 

3. When a popup asks you if you want to open the MyApps (AppsAnywhere) launcher, select Open AppsAnywhere Launcher.

  • If the MyApps launcher is not already installed on your computer, you will be prompted to download and install it
  • You can now access all the remote apps

4. After you log in to MyApps, launch File Explorer

5. The File Explorer window will now display:

  • H: drive, which represents your department file share
  • X: drive, which represents your home directory (if you have one)
Screenshot of Filer Explorer showing shared drives

Notes:

  • You may see additional drive mappings, depending on your access privileges

Overview:

The Microsoft Office suite, includes Outlook, OneDrive, Teams, Word, Excel and PowerPoint.

How do I access it?

Install Microsoft 365 on your home computer>>

Tool Functionality
OneDrive Store, share and collaborate on documents
Teams Send instant messages, and host online meetings and video calls
Planner Plan projects and track tasks
Stream Host and share videos
OneNote Take, organize and share notes and minutes
SwayCreate simple and effective communications
FormsCreate forms, surveys, quizzes and polls
To Do Organize manage and prioritize my tasks

Overview:

MyApps allows you access all the apps you that are available to YorkU faculty and staff remotely.

How do I access it?

  1. Go to the MyApps portal
  2. Authenticate using your Passport York username and password 
  3. When a popup asks you if you want to open the MyApps (AppsAnywhere) launcher, select Open AppsAnywhere Launcher.
  4. **Please note if the MyApps launcher is not already installed on your computer, you will be prompted to download it
  5. You can now access all the remote apps

Overview:

You are able to schedule and join meetings remotely using Zoom.

How do I access it?

For instructions on setting up zoom, please click here>>

**Please note to avoid uninvited members, we recommend that you set a password for your zoom meetings as per instructions at the Zoom meeting and webinar passcodes site.

Overview:

GENcom is a remote phone option for Windows PC allows you to send and receive calls that you would normally make or take on your desk phone from anywhere.

How do I access it?

Before you begin

  • You will need to submit a remote desk phone activation request. Once you’ve submitted your request, our Telecom team will send you your username and password which you can use to set up remote access to your desk phone.
  • These instructions are for York Faculty and Staff to use their personal desk phones remotely. If you are part of a call center, please contact telecomm@yorku.ca.
  • Installation of York VPN is required on your PC to use the remote desk phone client. For instructions to install VPN (Pulse Secure), please click here>>

Desktop Application:

Installation guide>>

Overview:

Certain websites and applications won’t load when you try to connect to them from outside the University because they are protected from being accessed by the public. Virtual private network will allow you connect to everything even when you’re off campus. Once you connect to our VPN, Ivanti Secure Access, our security will be able to tell you are one of us and safe to access what you need.

How do I access it?

For the best experience, make sure you only connect to VPN when necessary, and disconnect as soon as you are done your session. VPN will be required for you to access the following:

  • File shares like your H: drive (**Please note access to OneDrive does not require VPN)
  • PeopleSoft HR (admin users)
  • PeopleSoft Finance
  • Ellucian AWA
  • IBM Maximo
  • Insight
  • Security & facilities
  • Remote Desktop Protocol
  • All business systems with ancillaries

Please click here for instructions on how to set up VPN>>

Learn More

Not finding what you are looking for or need technical assistance? We are here to support you!